
 Yesterday I had to get up early-early in the morning for a quick work-trip to Spokane. Three hours drive for an hour's work followed by three hours drive home. That's a lot of time on the road, which is tough when you're not used to it.
It was exhausting, but I did stop by David's Pizza, so I could have some delicious company on the way back...

Just after picking up my pizza, I received a call from the plumber asking if they could come this afternoon instead of tomorrow morning. Thrilled at the prospect of having a kitchen sink with running water after three weeks of doing without, I agreed.
There are a lot of Do It Yourself projects I'm willing to tackle. Or at least attempt to tackle. Plumbing is not one of them. The potential for serious problems and even more serious damage just isn't worth the risk. I call a plumber for plumbing problems without hesitation, even though the cost is usually far more than I can afford to pay.
For installing my new sink, my new garbage disposal, and my new faucet, I had budgeted $1000. I figured it would more likely be around $800, but better to have more money saved than not enough.
The work order came out to $1400 after cash discount and some coupons I had found.
Guess I'm waiting a couple months before I get new cabinet doors and drawers.
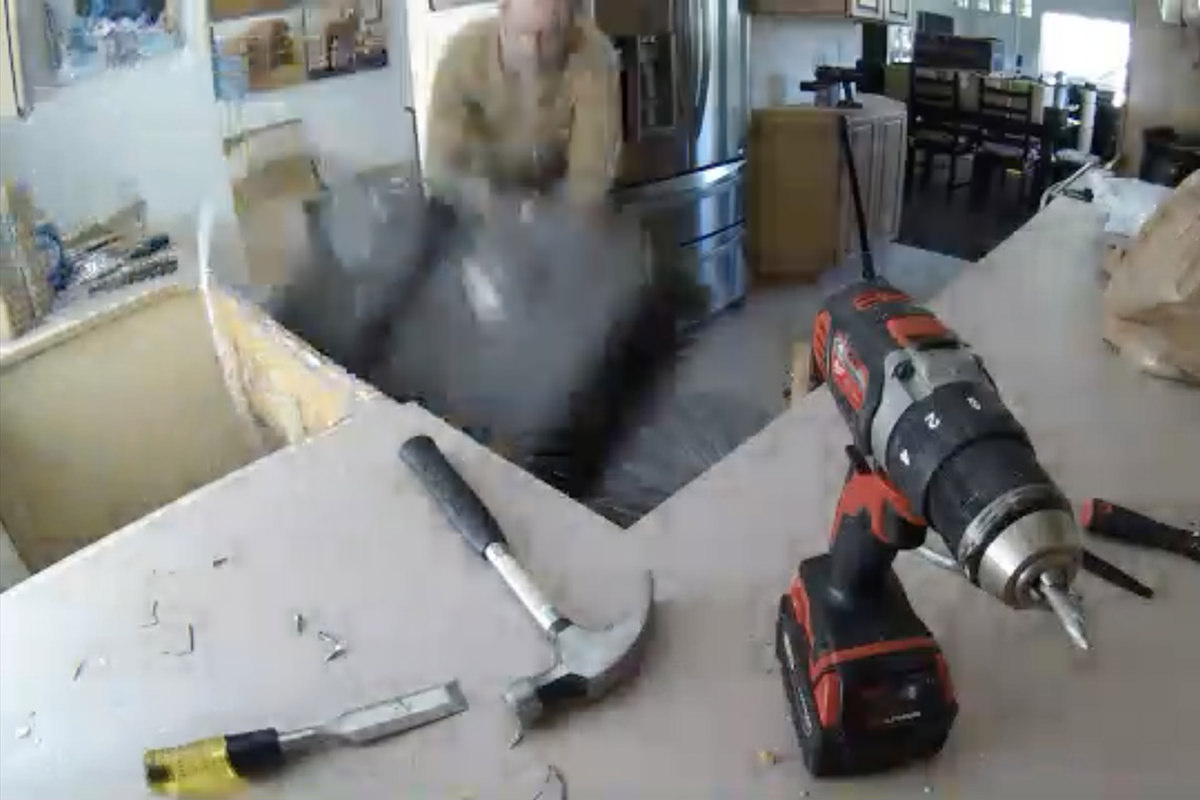
Turns out that $1400, which expensive, was probably justified. It took the guy three hours to get my fancy hardware installed. I had installed support rails for the sink, but the hardware to secure it was not exactly easy. I had installed the new control box for the garbage disposal, but it required some wiring. And don't even get me started on the automated faucet! There are more lines and wires required to install it than I could have possibly have guessed. Just look at all this...
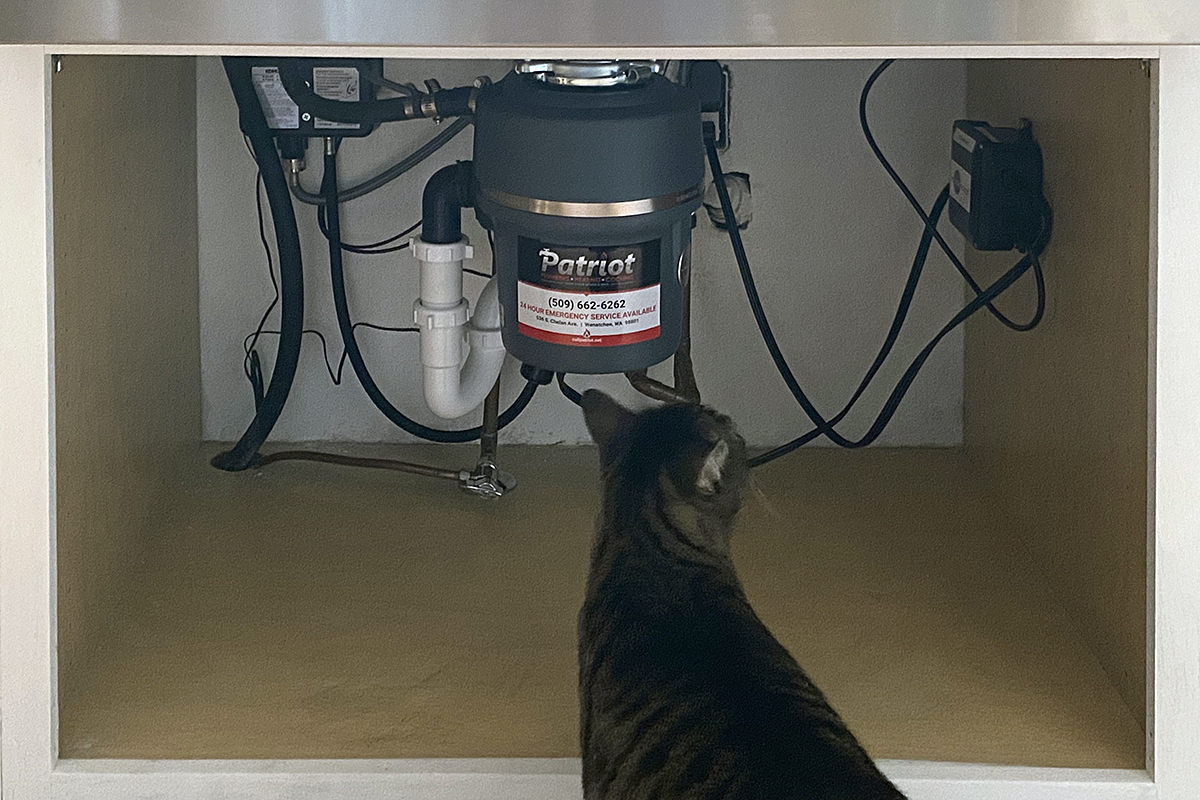
I'm going to buy some retaining clips so I can get everything pinned to the wall and looking nice.
The garbage disposal is quite a bit more powerful than the old one that came with my home. Surprisingly, it's considerably smaller and quieter as well. The thing kinda scares me, because it can rip through anything I dump into it in seconds.
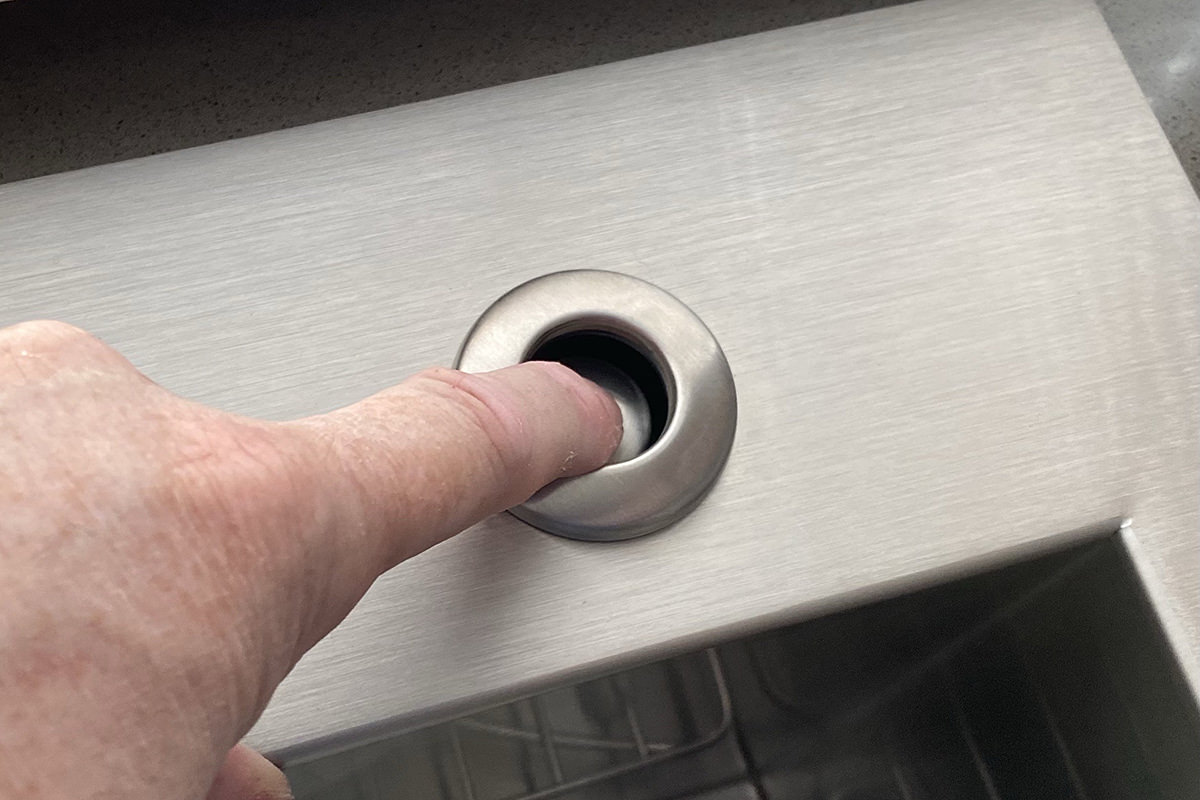
My old disposal was controlled by a wall switch. But since my new touchless faucet requires always-on power, I had to get a control box and remote switch so that the disposal wouldn't be on 24/7. I put the button where the soap dispenser is supposed to go (I wouldn't have used it anyway, because it seems like it would get crudded up easily)...
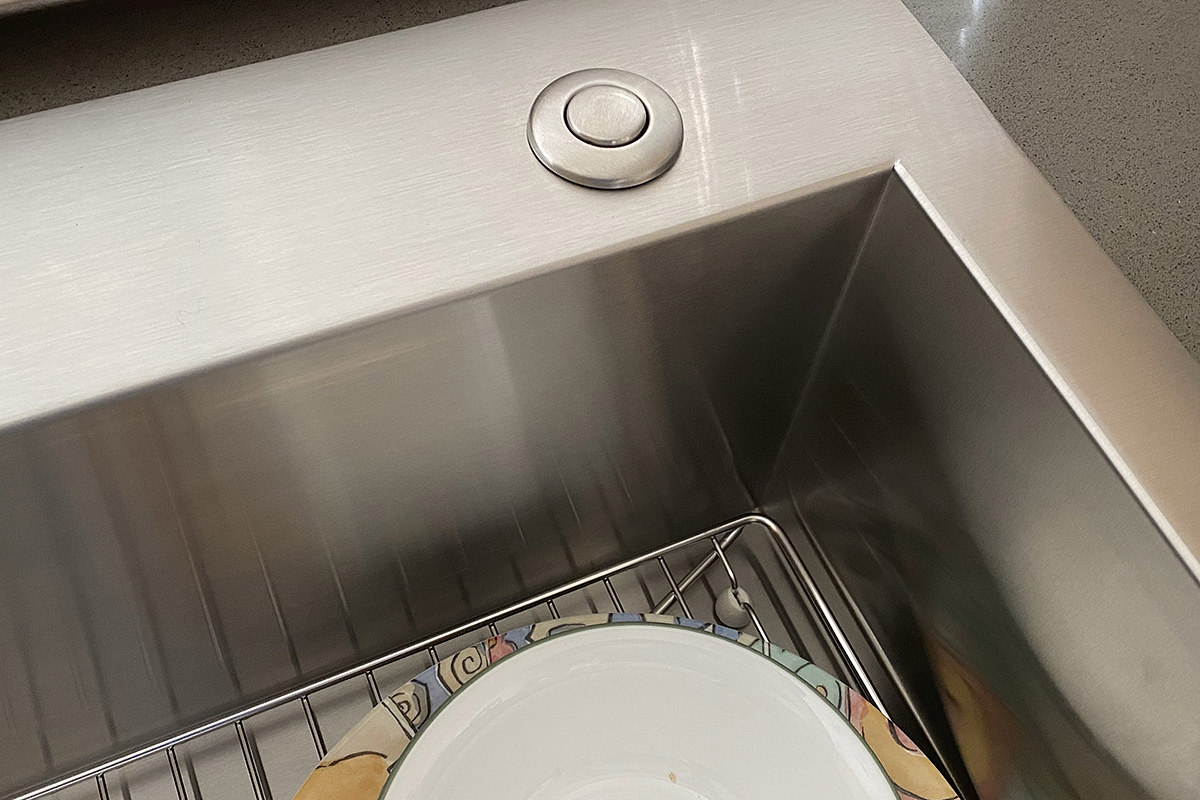
It's not electronic... it's air-activated. The button has a small bellows inside which sends a burst of air to the control box which turns it on/off. It's far more responsive than I thought it would be! It's also safe for the cats to walk over when they are naughty and being on the counters where they're not supposed to be. You have to press fairly deep to activate...
The sink itself is a stainless steel apron-front Kohler drop-in model (meaning I didn't have to rebuild my cabinets... just leave a hole cut out for it). It's very well made (as it should be for the price!) and beautiful to look at. I let some water dry in it to see if it gets badly water-spotted, and it's not terrible. Certainly no worse than other stainless steel sinks I've had...
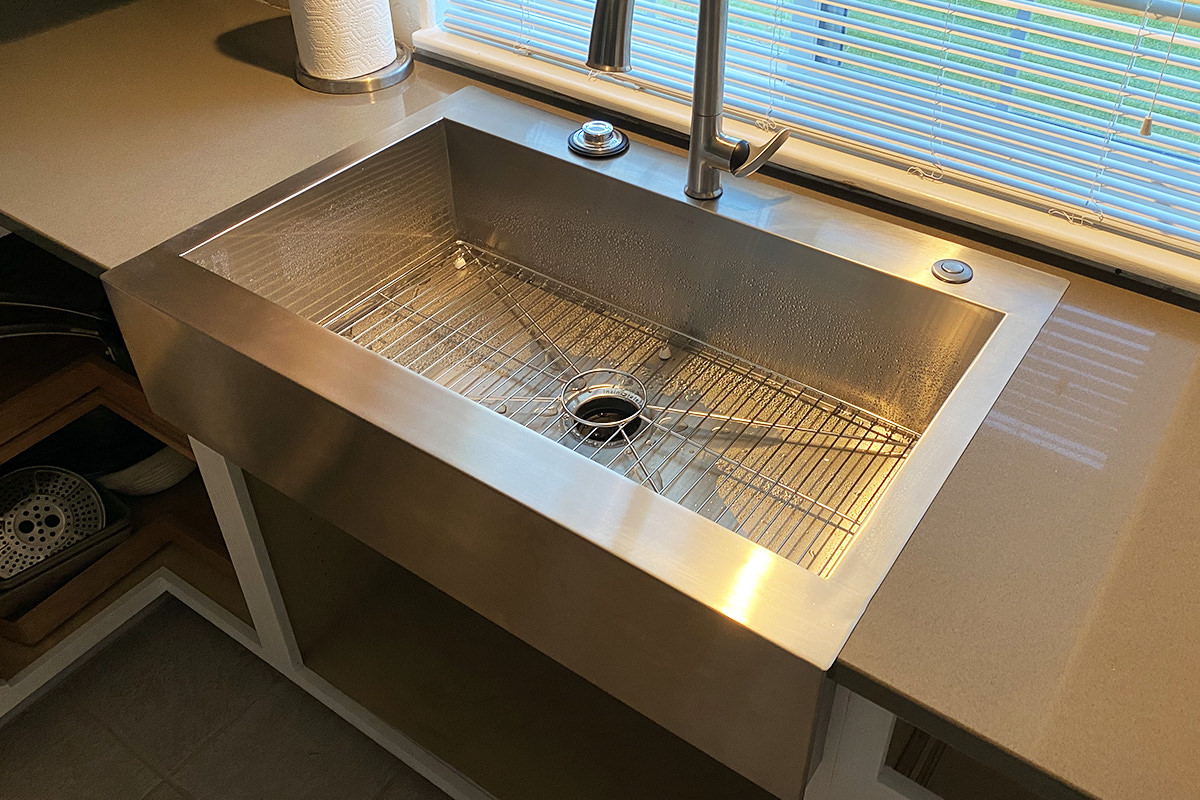
I totally love it. Goes with all my stainless steel appliances.
Now, about that faucet...
Originally I was getting a simple Delta faucet with a touchless sensor so I can turn the water off and on when my hands were goopy from cooking. But then a friend remarked that it was risky buying a different brand than my sink because then the finishes might not match. Enter the Kohler Sensate.
First of all, the sensor for turning off and on is up in the neck of the faucet. This is great because if my cats are up there (where they know they shouldn't be) then the odds of them being able to turn it on are slim. Also... if they do manage to turn it on, it will turn itself off after a while so I'm not wasting water...
The spout can detach and be used as a sprayer-wand, which is nice.
This faucet can integrate with Kohler Konnect so I can add Alexa voice commands at a later time if I want to. Then you can say stuff like "Alexa, dispense 2 quarts of water" and the faucet will totally do that. I didn't go to that expense because it seemed rare that I would actually need to do something like that. Maybe if I were making Kool-Aid or something? I dunno. It sure is a beautiful faucet!
And so now I just have to install my tile backsplash and finish my cabinets. Which sounds a lot easier than the work involved to actually do it, alas.
 I'll tell you what I want, what I really really want...
Concrete countertops.
I just love the industrial look of them. So the first thing I did when I finally got the money together to start working on my kitchen was to inquire about having them installed. What I was told was "Sure we can do that, but you might want to look into fake concrete manufactured stone. The fake stuff has a more consistent finish (not so blotchy), doesn't have to be sealed, is more resistant to scratches and staining, and could ultimately be cheaper. Furthermore, concrete may be a turn-off when it comes to re-sale value, as not everybody appreciates the look."
Well okay then.
I pulled four samples of "concrete" countertop material. One of them looked awful under my kitchen lights and was immediately eliminated. Since I couldn't afford to replace my kitchen floor tile, I eliminated another sample because it didn't go very well...
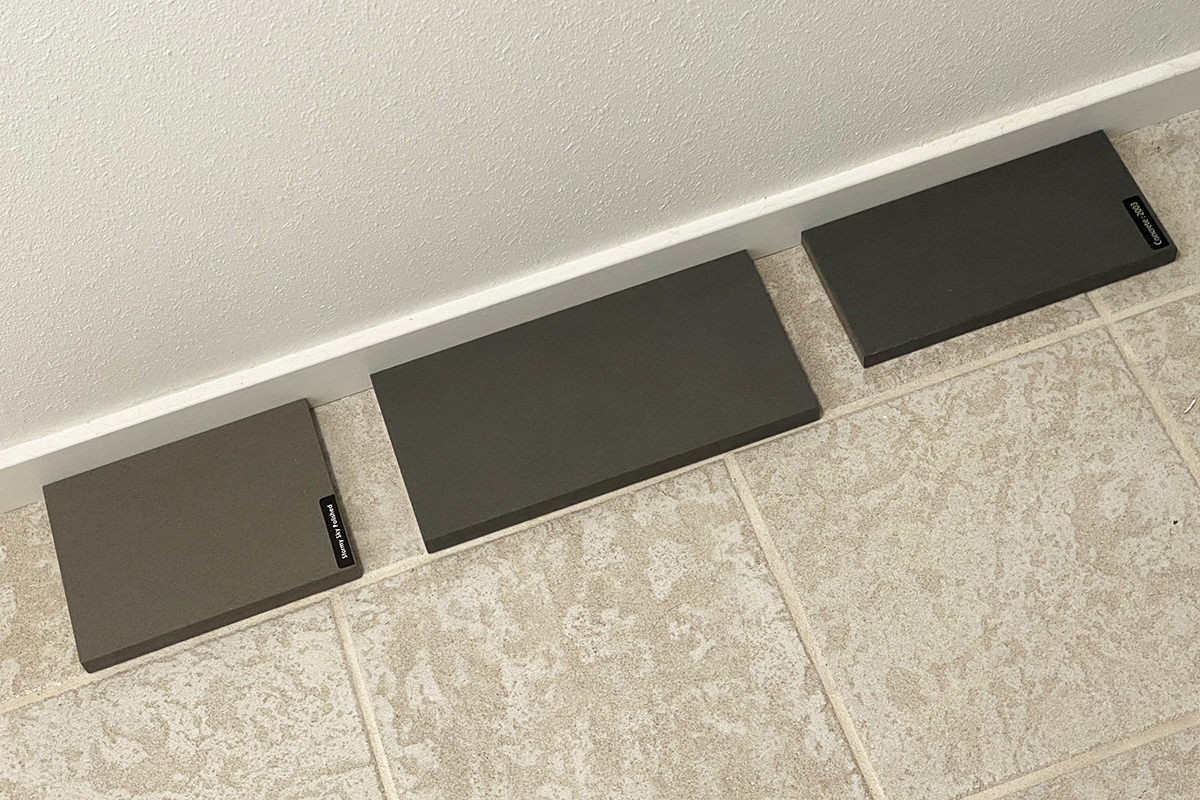
I liked the more "gray" color of "Concrete" because it seemed more authentically concrete-like to me... but the "Stormy Sky" had a hint of brown warmth that made it a better fit with my hardwood flooring (which you can kinda sorta see in this photo, but not really)...
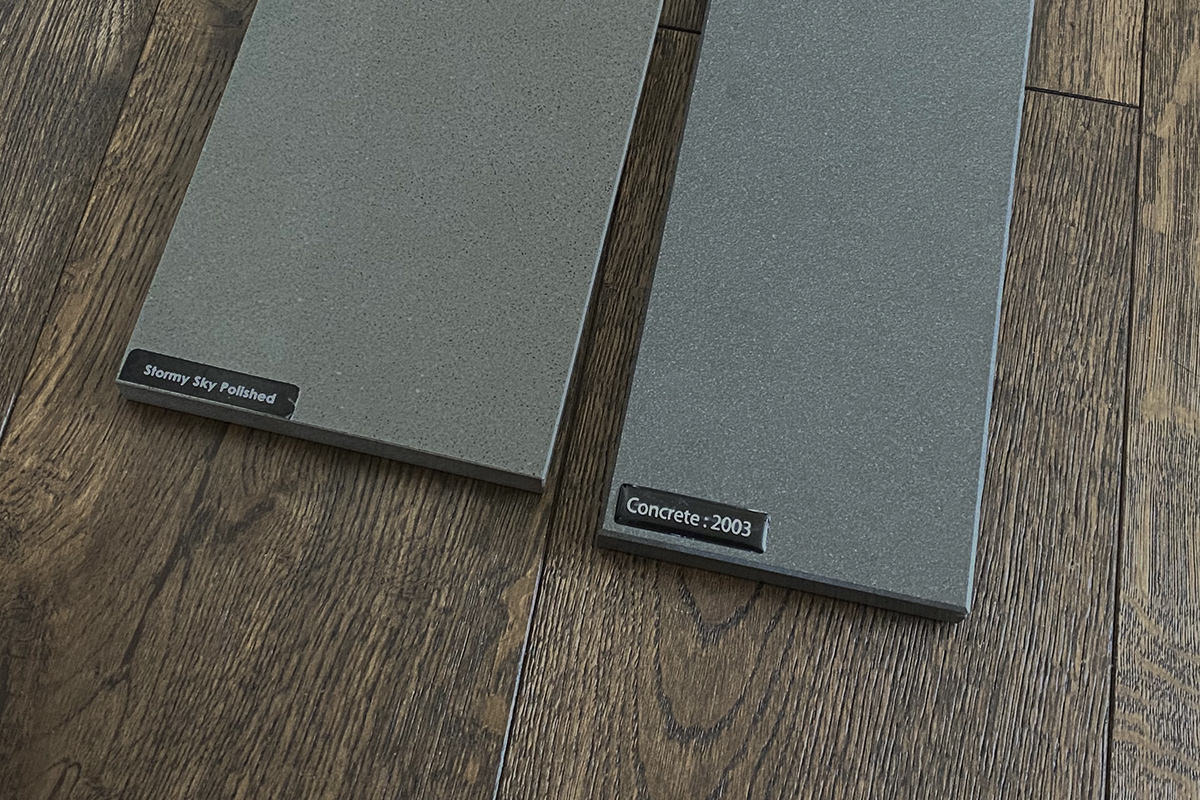
It ultimately seemed a better match all the way around as I looked at it under different light, so I ponied up the downpayment and had a slab ordered. They templated my kitchen on the 13th, then this past Friday they got installed...
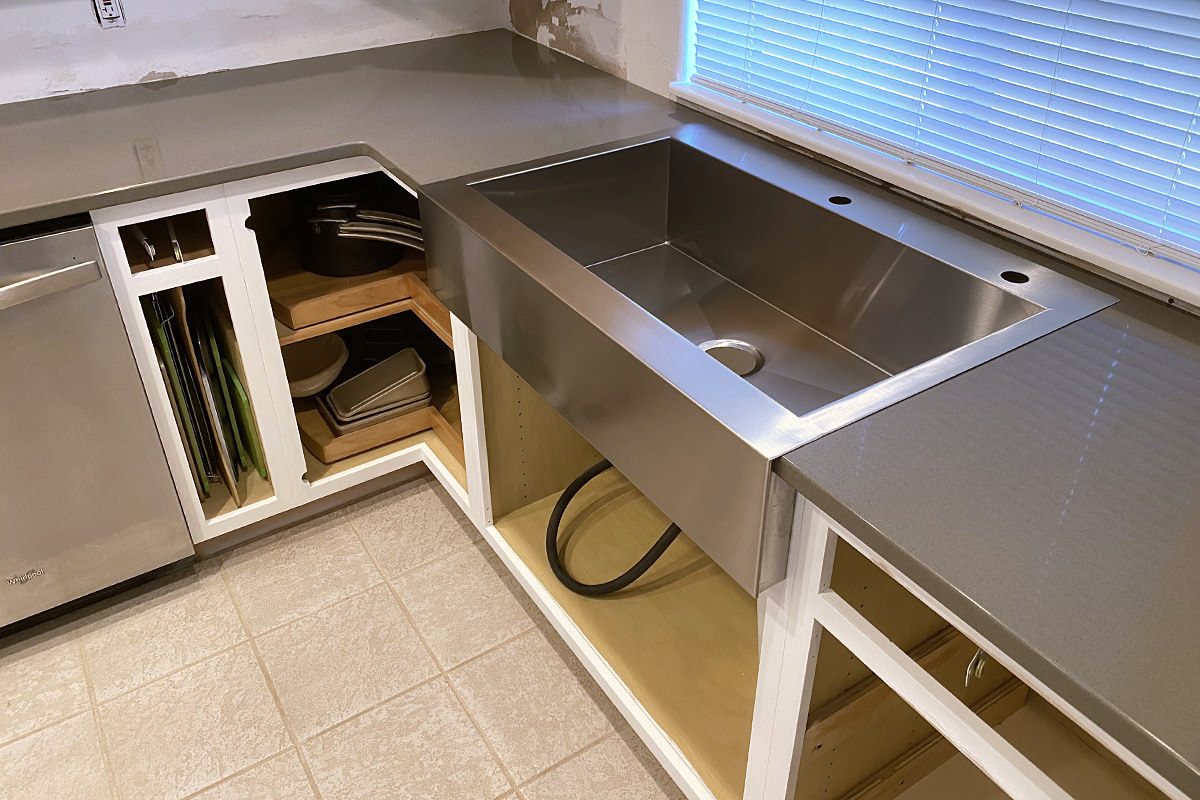
They are absolutely amazing-looking. They have the concrete "look" I wanted, but are more refined... and a better color match for everything else in my kitchen. Including my new stainless steel sink you can see there. But what I love most? They are perfectly smooth! I can easily disinfect them and feel comfortable kneading breads and preparing other foods directly on top. With my old, ugly laminate countertops, I wouldn't dare because they had a rough texture where germs can hide. Really excited to make cinnamon rolls and pizza crusts now that I have a large, sanitary surface I can work on!
And tomorrow my plumbing gets installed. After three weeks without running water or a kitchen sink, it's been a long time coming!
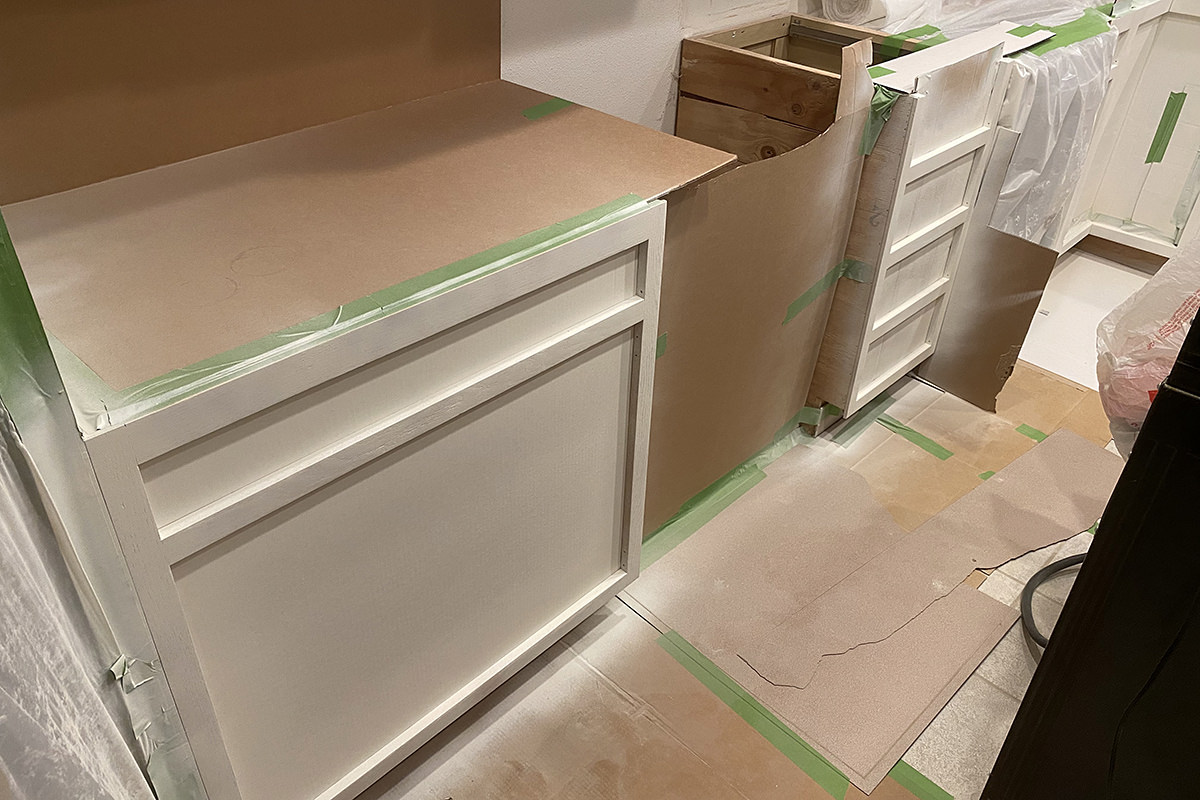
 After de-greasing, cleaning, rinsing, sanding, scrubbing, and drying my lower kitchen cabinets this past week, it was finally time to start painting!
First with a base coat of KILZ oil-based primer to seal and prime the surface... which made my home smell like a toxic waste dump. It's seriously bad (from what I can tell, the smell is so toxic that they can't even sell the stuff in half the USA or something). But I wouldn't dream of using a water-based primer for kitchen cabinets... it's just not tough enough for the beating they're going to take. And so I open every window in the house and turn on every fan I own to help air things out. The GOOD news about going oil-based is that the stuff is dry and ready for sanding in an hour! Then I could spray another coat of KILZ, wait an hour, sand smooth again, THEN START PAINTING AT LONG LAST!
My worry about the smell led me to feed Jake and Jenny in my bedroom. Since cats will only eat something they can smell, I added stinky fish flakes to make sure they could smell their dinner over any KILZ primer fumes that might have driften upstairs.
I tested five different "whites" for my kitchen cabinets. I ended up using "Simply White," which is on my walls and not the "Cloud White" that's on my trim nor the "Snowfall White" that's on my furniture nor the "Decorator White" that's on my Insets nor the "Oxford White" that's washed on my guest room IKEA. — It's weird how "white" works in paint. In order to match everything, you have to accommodate lighting, gloss, finish, surface, AND matching flooring... it's exhausting.
I am very happy with the Simply White that I ended up with. It's warm enough to not be sterile, but still very, very white...
And tomorrow my countertops get installed.
Home renovations on your own is a lonely, tough game to play.
It doesn't help that I totally have no idea what I'm doing and have to figure everything out from looking at YouTube videos.
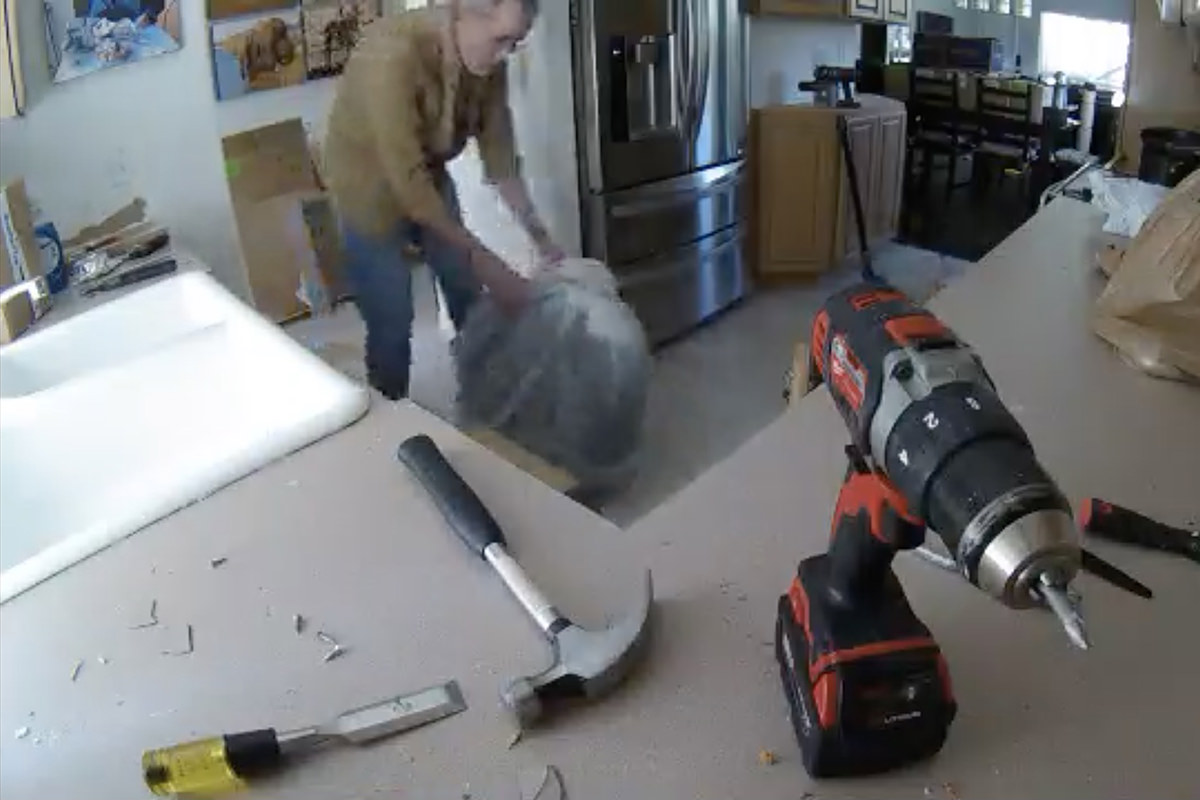
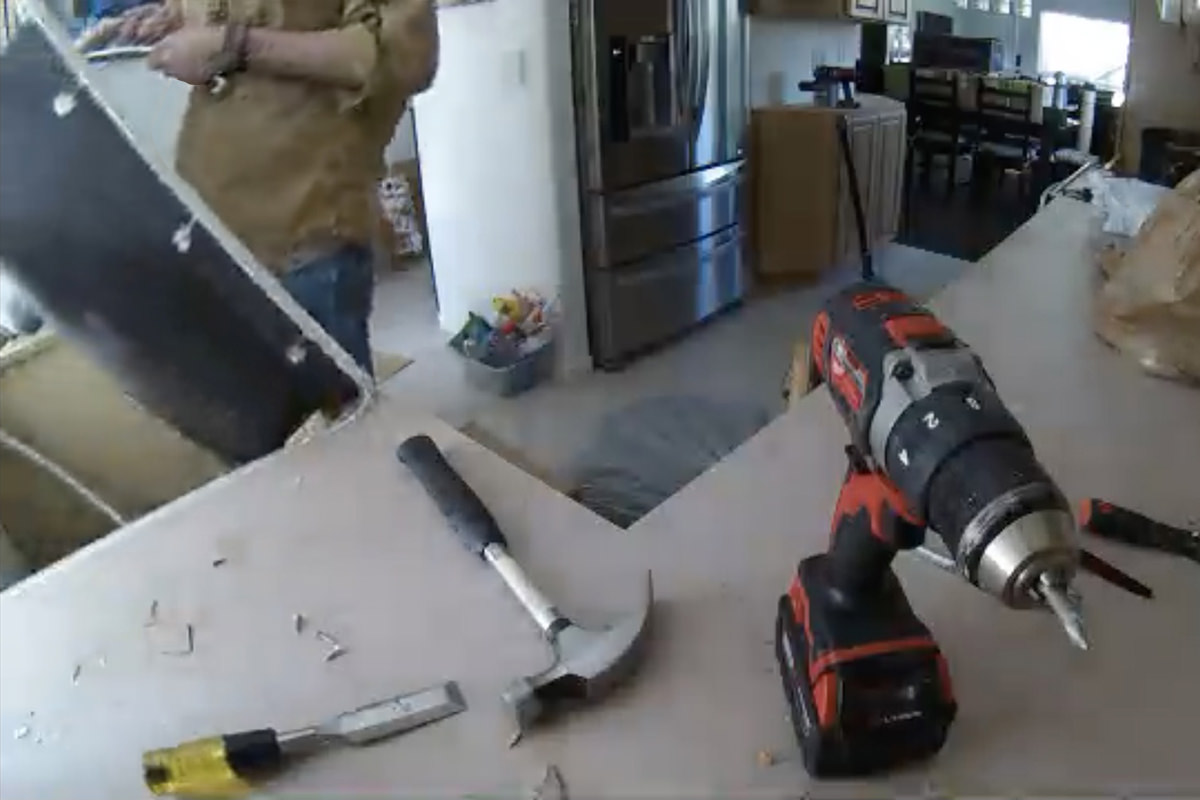
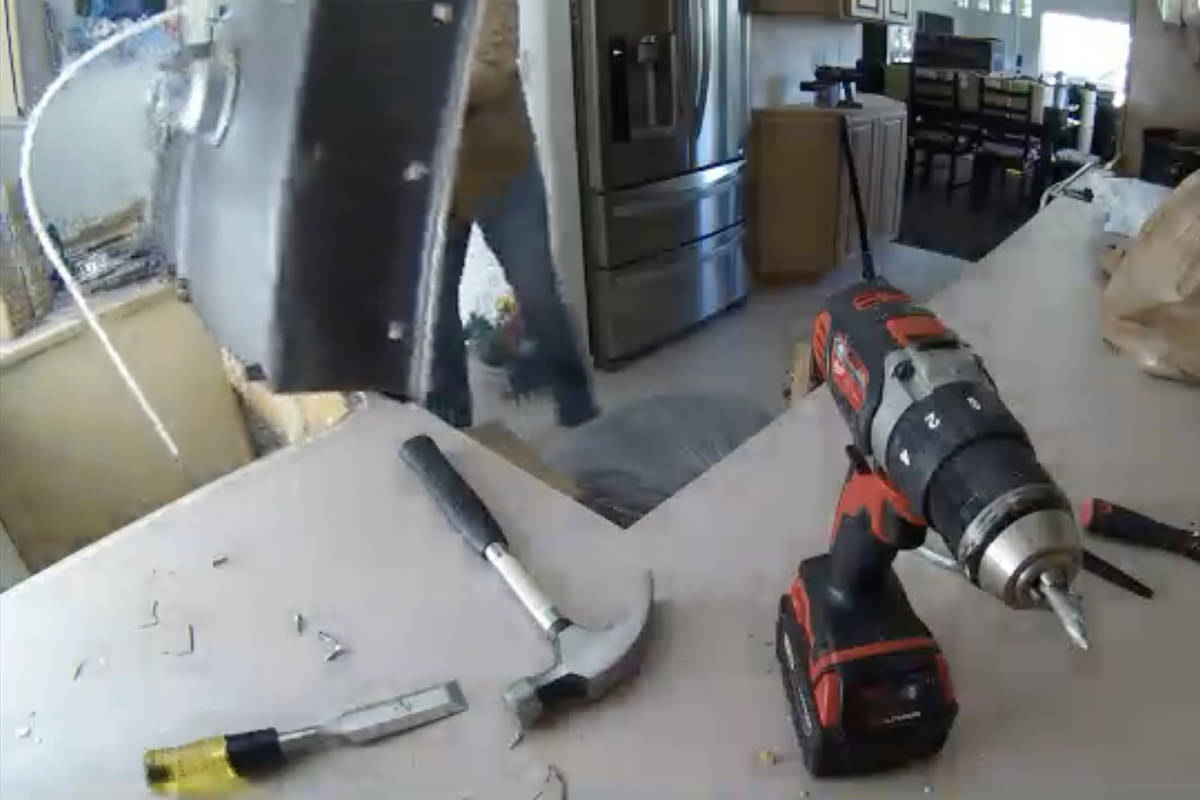
One of the bigger challenges I've face so far is that I've got huge chunks missing out of my kitchen wall. The contractor who built the kitchen used warped boards for the backsplash. Instead of finding boards that weren't warped, they used a ton of glue... and some metal flanges pounded into the wall to flatten things out. When I removed the backsplash, the wall came with it...
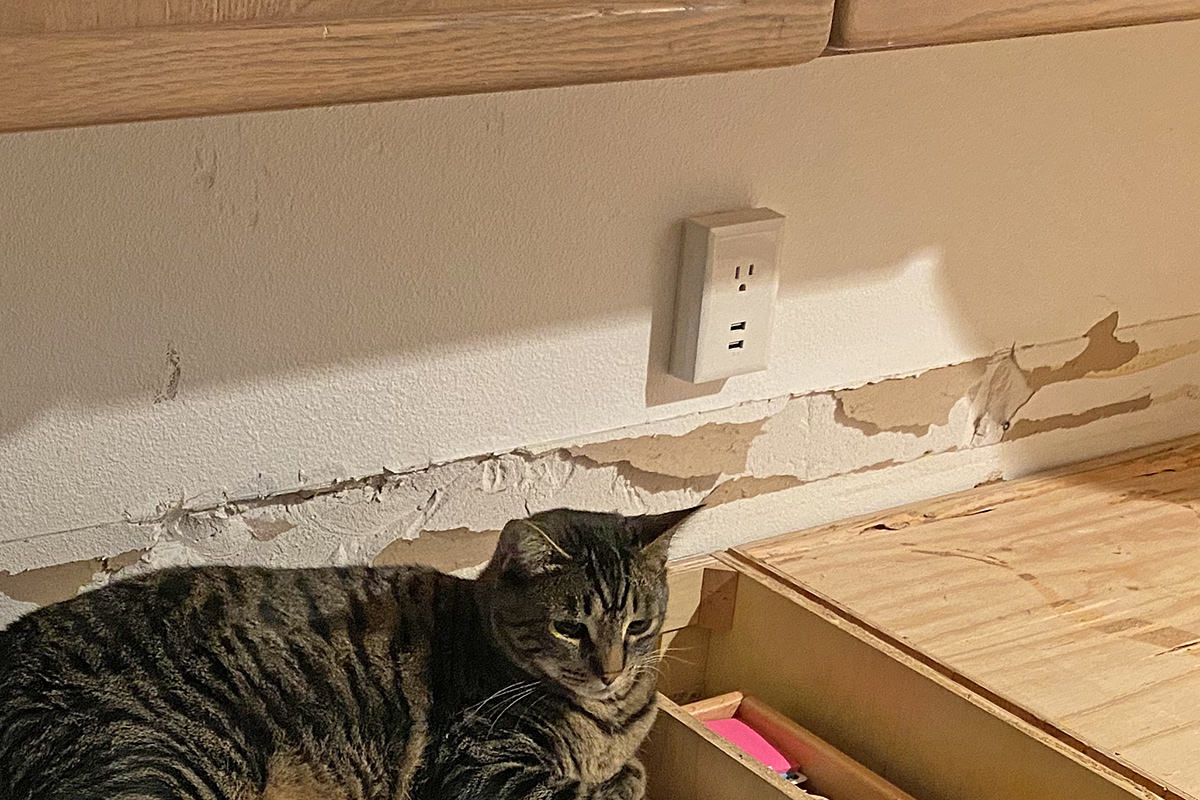
The holes were way too big for spackling paste. My first instinct was to just cut out the damaged areas and patch with new drywall. THAT I know how to do. But sheets of drywall board won't fit in my car, so I had to wander the aisles of Home Depot until a solution presented itself. Fairly quickly I came across cans of GREAT STUFF BIG GAP FILLER. I found an employee and asked them if I could just squirt it at the wall and use a putty knife to fill the holes. That was apparently hilarious, and they had to explain that gap filler expands into gaps and wasn't something I could use like spackling.
I bought it anyway because GREAT STUFF BIG GAP FILLER sounded like it could be made to work somehow. There were big fucking gaps in my wall, after all.
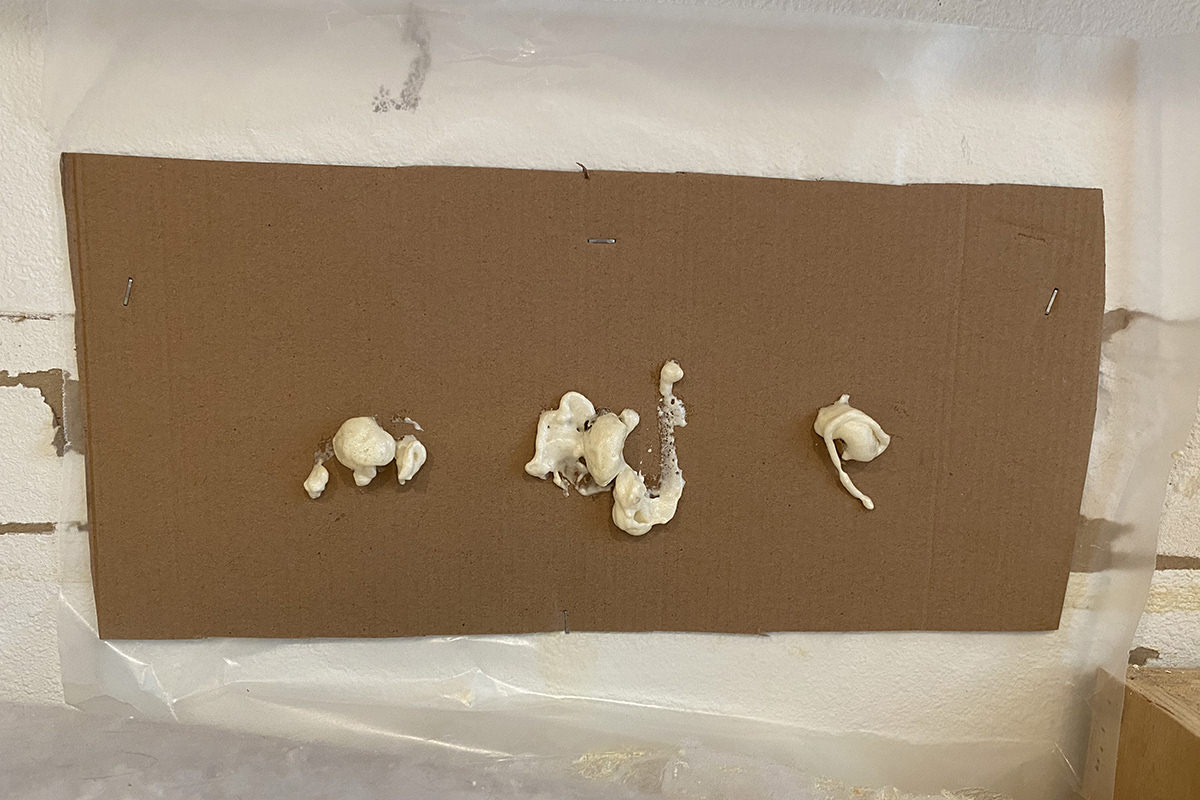
My solution? Use cardboard backed with wax paper stapled to the wall, poke holes in it, then pump the gap foam into the cavity behind my makeshift wall mold. With any luck, the foam wouldn't stick to the waxed paper and I'd be good to go. Home Depot guy was right about one thing... the stuff expands like a herpes outbreak. I barely squirted anything in there and it came gushing out of the holes immediately...
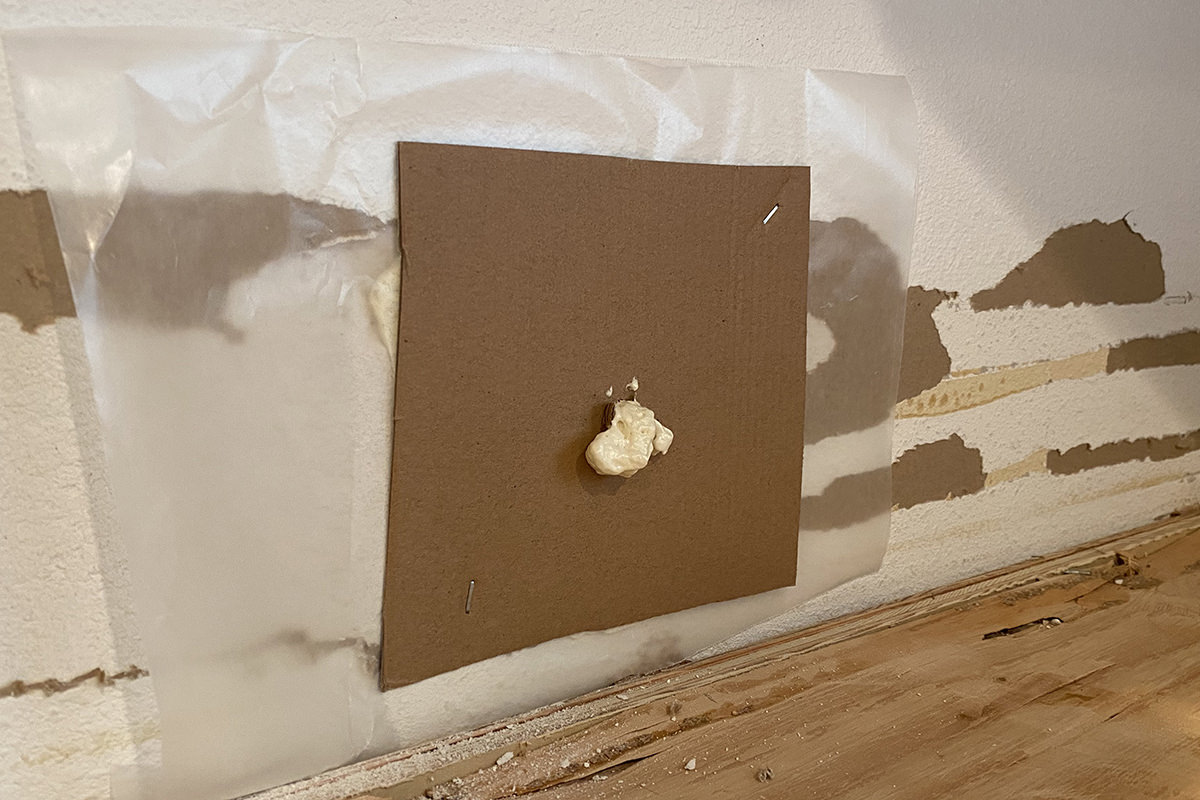
The next morning I pulled the cardboards off the walls and it worked like a charm...
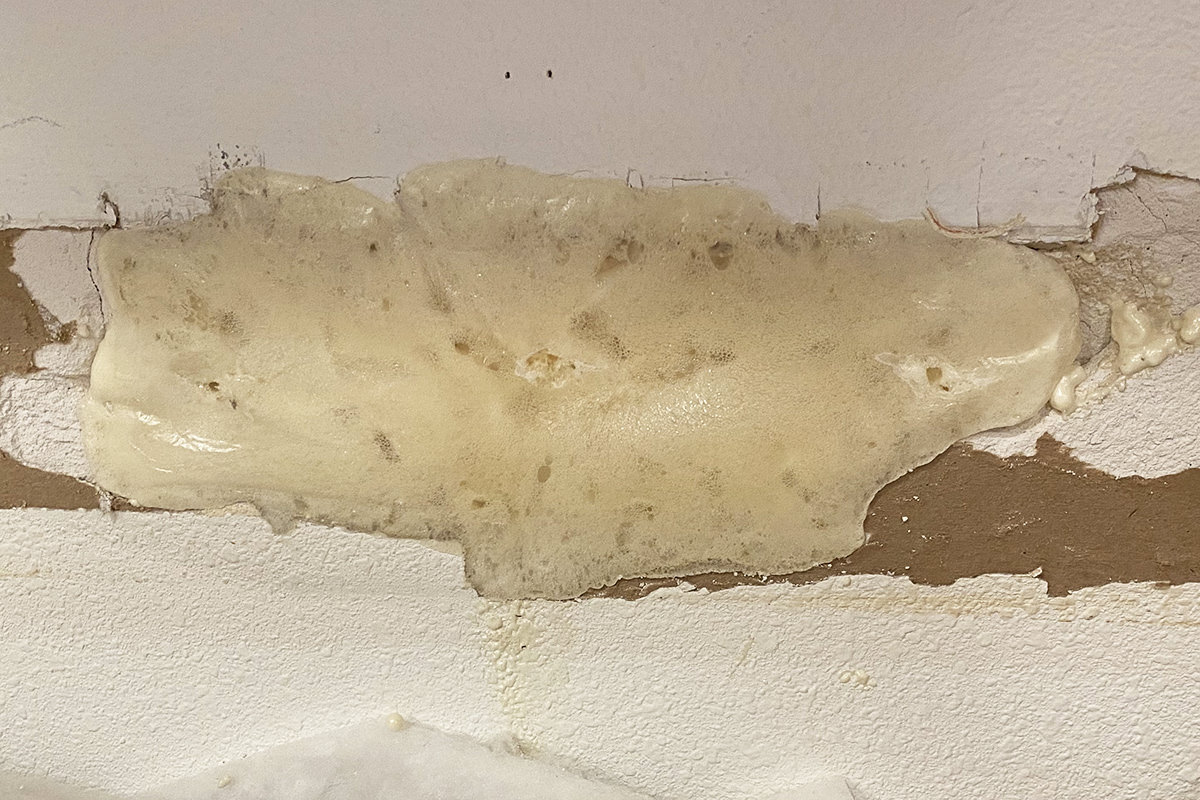
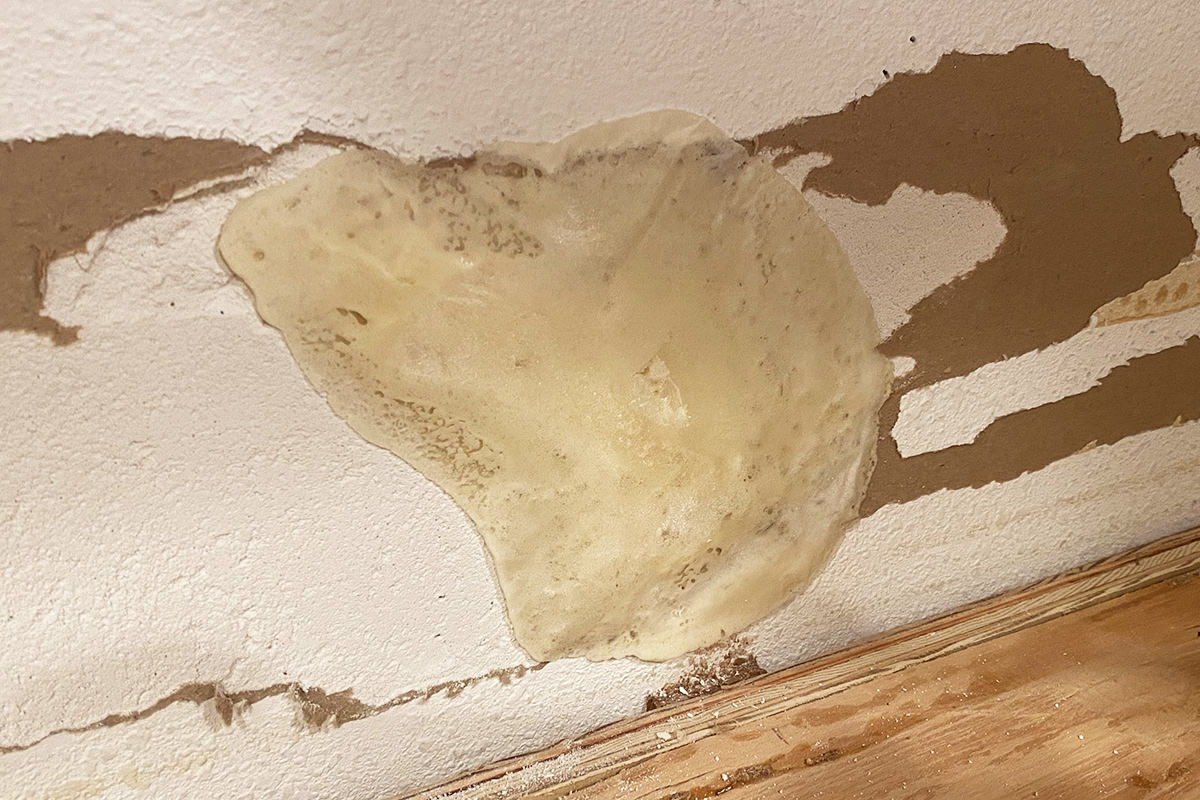
Once dried, the stuff is pretty darn tough! Actually felt stronger than drywall. I used a hacksaw blade to trim off the excess, then filled the bubble holes with spackling...
After sanding it down I was left with a perfectly flat surface that I can eventually tile over. Sweet!

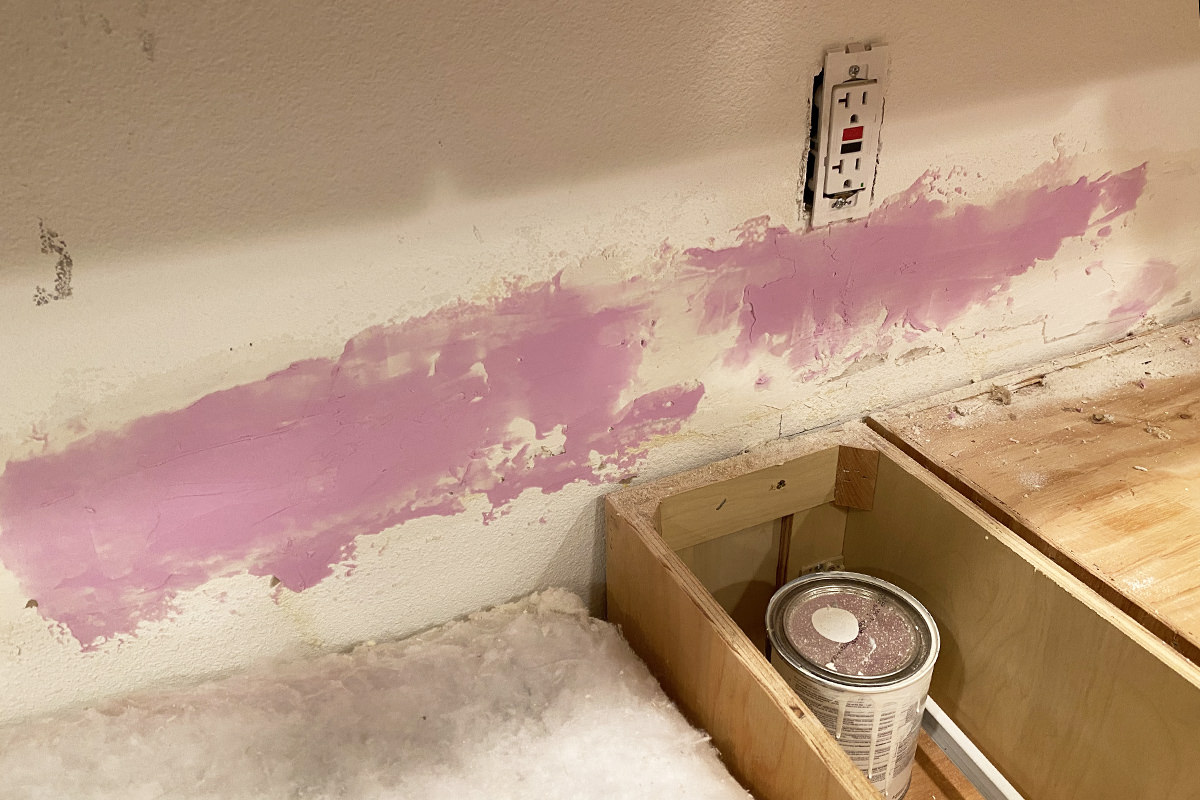
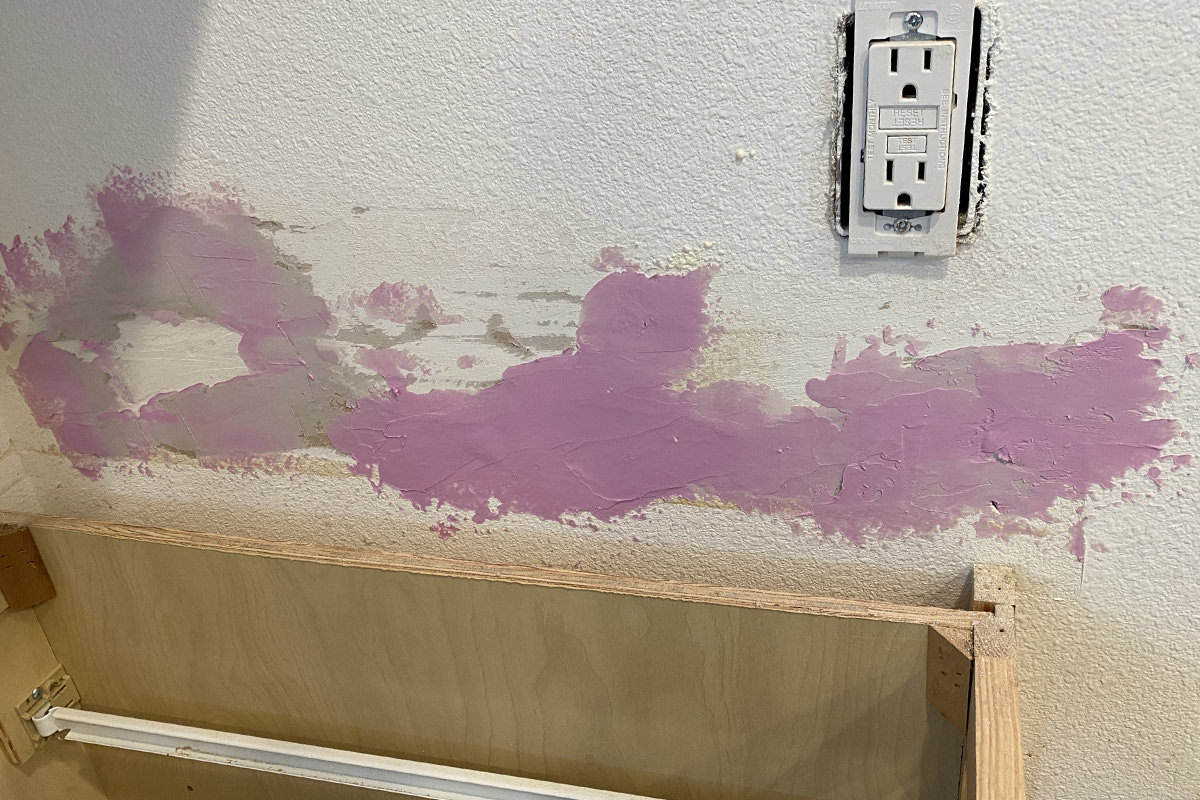
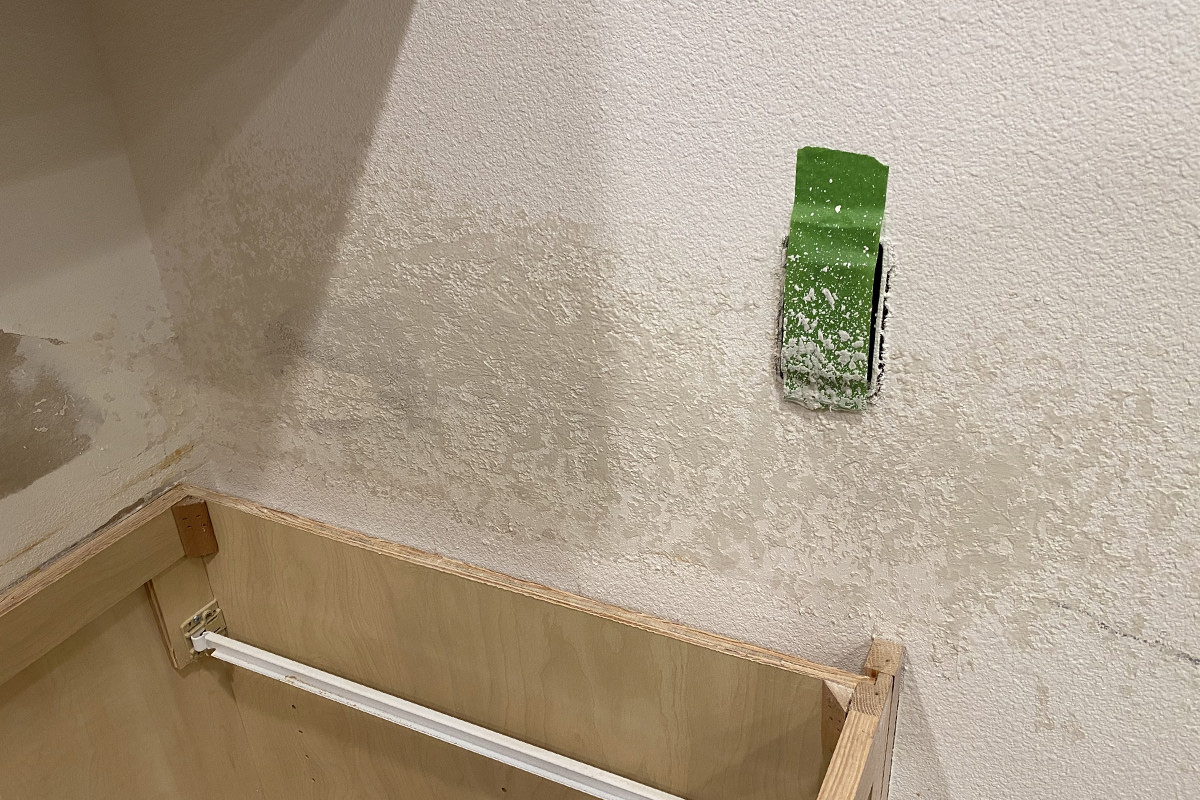
I decided that I didn't want to tile on the wall that came out from under my cabinets because I thought it would look weird. So after using the BIG GAP FILLER and spackling I just sprayed some wall texture over the top. Once I paint it, I think it will look just fine...
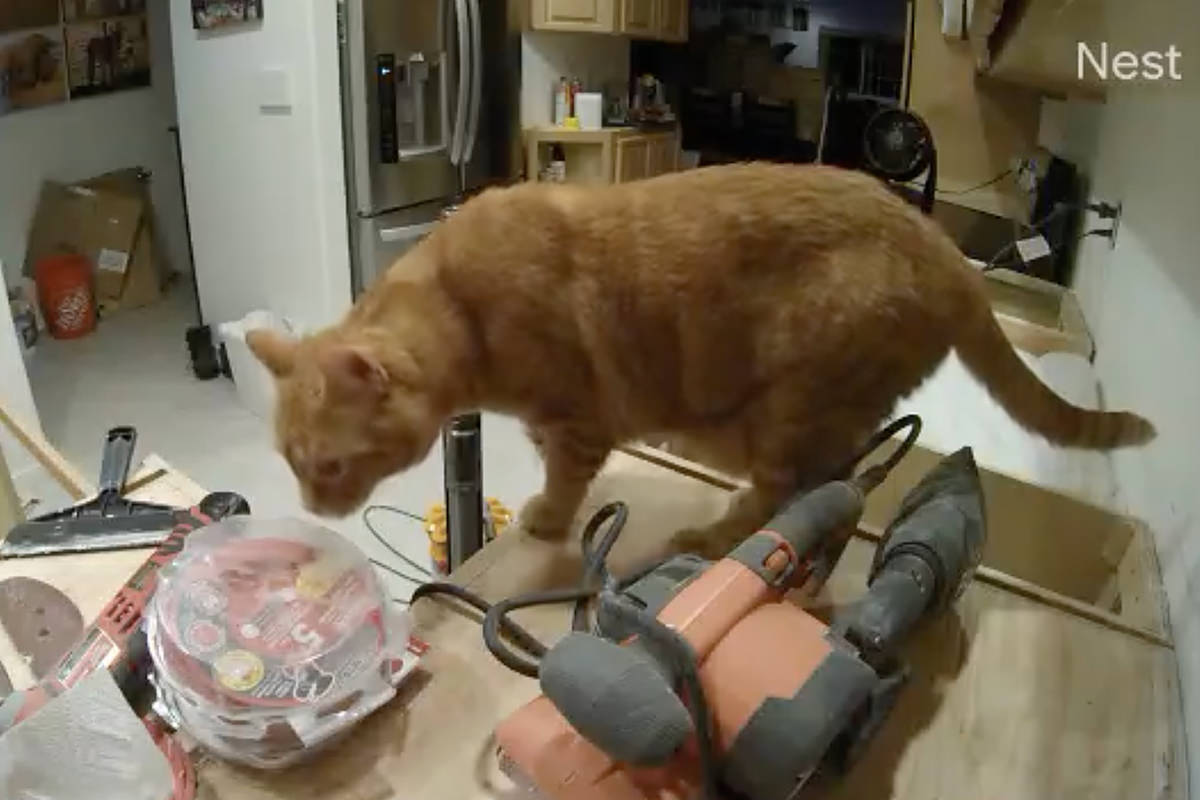
Jake and Jenny inspected my work and were obviously impressed...
And... one more task down... a couple hundred to go.
But tomorrow there's just one task on my mind. I need to paint the frames on my lower cabinets before my new countertops arrive on Friday.
What's another night without sleep?
 For some reason, I thought the templating for my new countertops would happen with a tape measure and a pad of graph paper.
Not even close.
There's a templating machine which far more accurately measures the exact specifications needed to cut your countertops with scary precision. It looks kinda like a metal stylus attached to a wire that's attached to a measuring machine. I went looking on YouTube to see if there was a video of the thing and, sure enough, here it is...
Now I've got a two-week wait until my countertops have been cut and are installed... followed by a three day wait until my sink, faucet, garbage disposal, and disposal switch are installed. It's probably going to feel a lot longer than it actually is.
And while I can do without a sink and countertops for that amount time, I pretty much have to have a working dishwasher. My bathroom sink isn't big enough to do dishes, and washing them in the shower seems like an ordeal. And so... I've MacGyvered a pretty terrible solution using pipes and waterproof repair tape. It seems to work okay... but I definitely won't be running it unattended.
Everybody wish me luck that my kitchen doesn't end up underwater.
 I am trying to figure out exactly how big of a moron you have to be to attempt any kind of home renovations during a pandemic. I'm guessing it has to be fairly huge.
I am, of course, speaking from experience.
With an uncertain future ahead, I decided to bite the bullet and finally get around to the kitchen remodel that I wanted to do when I first bought the place almost five years ago. That was always in the plan because my kitchen is heinous, but I ran out of money. It's always bothered me, but it's not like I should really care. However... if I end up having to sell my home, the value will definitely drop if I don't have a much nicer kitchen than I do now.
So here we are. I liquidated my vacation fund since I won't be going on vacation any time soon and started planning. I found a countertop material I liked then scheduled the installation. They are measuring things out tomorrow, then installing two weeks later.
Which means I will be without a kitchen for at least two weeks.
Step one was to rip out my old countertops. Originally I was hiring a contractor to do it in July. But when they had to reschedule I decided to just bag it and do the tear-out myself. Not only would this save me some money, but it would also help to limit the number of potentially infectious people coming into my home. How hard could it be? Demo-day always looks like a piece of cake on all those home renovation shows!
Turns out it's a total nightmare. Whomever installed my laminate-over-particle-board countertops went way, way overboard. They laid down a stupid amount of glue... then nailed AND screwed them to the cabinetry. It was absurd. In some places there was so much glue that the particle board could only be removed in chunks with a chisel. A process I thought would take a couple hours ended up taking almost my entire day.
But the countertops weren't even the worst part.
That would be removing the cast-iron kitchen sink. The fucker was well over 100-lbs. Maybe a good 150-lbs. And as macho as I like to think I am (ha!) there's just no way. Not with something this big and unwieldy.
Since my new countertop measurements are being taken tomorrow, I could either A) pray I could find somebody to help me last-minute... or B) attempt to use brain over braun and see what happens.
I'll take door number two, Monty.
Much as I'd love to replace my kitchen floor, that's a dollar amount I do not have, so they are staying. But since a 150-lb. sink dropped on the floor would likely smash the tiles, I had to come up with a plan.
First I laid down a thick slab of heavy-foam insulation. Then I put wood on top of that. Then I constructed a cardboard "cradle" to flop the sink upon. This was tricky, because it needed to be designed to crumple. Otherwise the sink might bounce off the cardboard and smash the tile. I need it to fall flat. Then, just to cover my bases in case the sink didn't land as planned, I rolled in my winter snow tires and put them around my cradle...
I managed to pull the sink up on the countertop ledge...
Then... bombs away...
I left the faucet attached so I had something to grab onto, and that worked pretty well. My cardboard cradle slowed the fall then crumpled flat exactly as I designed it to do, so there was no bounce at all.
Then I had to wiggle a towel under my cradle so I could pull everything into my garage. Much like the way that aliens moved all those giant stone blocks when they built the pyramids.*
The rest of my night was spent chiseling glue. A futile gesture to be sure. I am going to have to use a belt sander to remove it and get down to the cabinets, which is crazy-stupid. I'm also going to have to repair a bunch of drywall, because whomever installed the backsplash used a warped piece of wood that they had to ANCHOR into the wall with steel flanges. Which means the only way to remove the backsplash was to literally rip it out of the wall. And that wasn't easy considering they used enough glue to repair the Titanic.
So... yay... I get to do drywall repair, which is like my most favorite thing in the world!
Not.
But I guess that's what you gotta do if you don't have money to throw at people to do the work for you. Unless you don't mind having big chunks torn out of your kitchen walls.
*Despite the fact that there are records showing exactly how the Egyptians built the pyramids, apparently it's easier for dumbasses to believe that aliens built them? Alrighty then.
 Home ownership is the money pit which never ends. No sooner than one expensive problem is solved than another pops up to take its place. Or, in my case, several things.
In an effort to save a hit to my wallet, I'm taking on the repair tasks myself. Some of them are difficult and require research. Others are easy but require money. My favorite things are those that are easy and cheap. Those tasks I tend to do right away because easy and cheap are my middle names.
Well, you know what I mean.
When I bought my new place, I had to do a lot of remodeling so my mother could live there safely. She couldn't walk on carpet very well, so I had to rip it out and put in hardwood. Simple tasks were becoming difficult and messy for her to manage, so I tried to accommodate that as well. I ripped out tubs and enlarged showers so it was easier for her to get in and out of... and clean. I also replaced the toilets from two-part standard models to one-piece "comfort height" models. I did whatever I could to make things easier for both of us.
I don't know if you have ever shopped for toilets, but single-piece models are expensive. Even the cheapest ones are double or even qradrupal what it costs for the standard stool/tank model that's commonly used. I ultimately went with Kohler because I found them on sale for $400 each (regular $600). Given that you can easily find decent 2-piece models for under $100 each, that's a heck of an investment.
You would think that a $400 toilet would have pretty good quality parts for the money.
Yeah... not so much.
From the get-go, both toilets would randomly start running for around a minute. At first I'd notice it happening a couple times a month. Then weekly. Then daily. Aghast at the water that was being wasted, I managed to fix the downstairs toilet just by taking it apart and putting it back together. The upstairs toilet, however, never managed to be fixed no matter how many times I worked on it. If anything it got worse, running 4 or 5 times a day. Because of the lockdown I ended up with extra time on my hands and decided to take another crack at it. I started taking it apart and... snap! The middle of the "AquaPiston" flush valve snapped. Rather than just buying a replacement for that, I decided to spend $20 and get an all new AquaPiston. Despite being advertised as having "leak-free performance," it was the only part that could really be the problem. Wanting to make sure that it was a genuine Kohler part and not a knock-off, I ordered direct from Kohler.
The part finally arrived and, viola, the problem was totally solved...
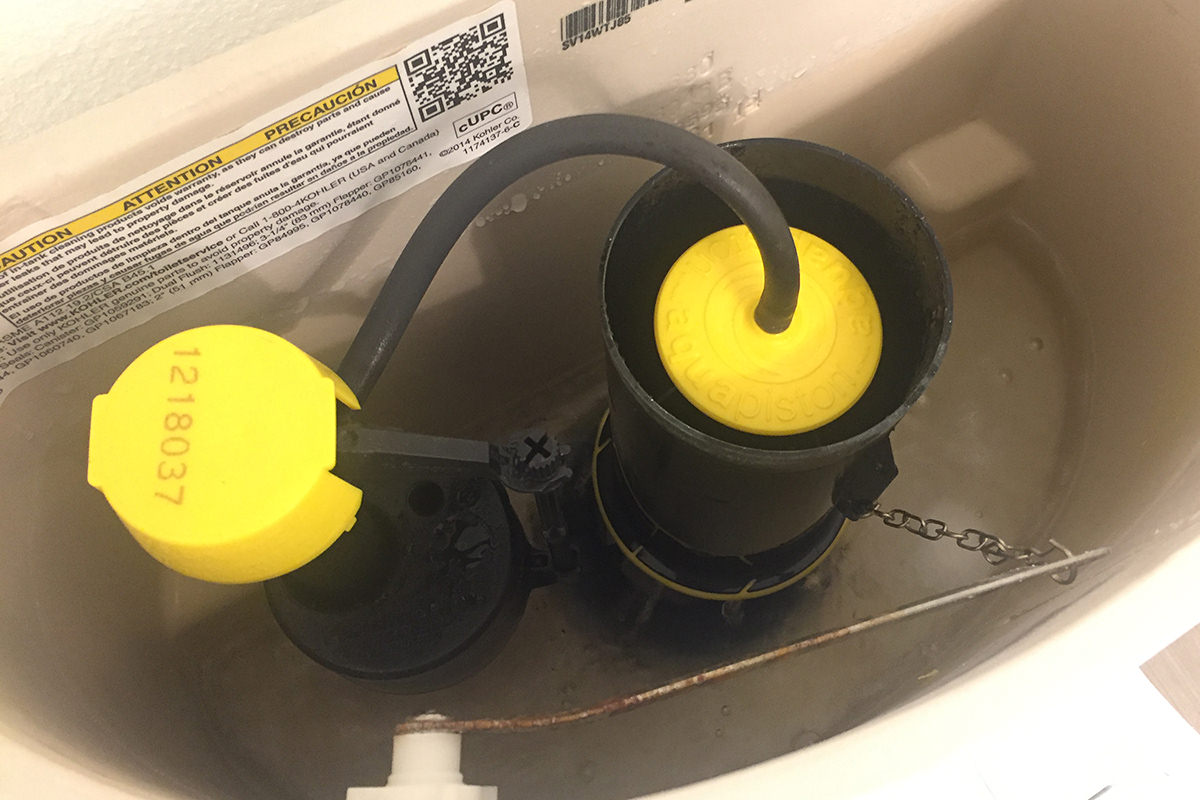
Apparently the AquaPiston which came with my toilet was defective.
Note in the photo above that the handle trip-rod has rusted. $400 doesn't get you a non-rust part, I guess.
I've now reached the point where the projects I'm facing are far more pricey. Some I can't even do myself. I was really hoping that this year would be the year I got to replace my countertops, sink, and garbage disposal. All of them are awful, and there are issues with the disposal that simply can't be fixed. The worst part is that it leaks underneath when the waste/water level gets too high. But it doesn't make much sense to replace it if I don't replace the sink (which is cheap, damaged, and looks terrible). And it makes no sense to replace the sink before replacing the countertops (which are just cheap and terrible). I was making good progress with my savings until the pandemic, now I don't know if it's an expense I can swing no matter how badly it's needed. Maybe I'll look into a home equity loan or something, because the longer I wait the more it's going to cost.
So much for having the luxury of being cheap and easy, I guess.
 Jake is doing so much better, so thanks to all of you who reached out with concern and kind words! He still limps... sometimes more than others, but he's showing vast improvement. I wouldn't be surprised if his limp is mostly gone in another week.
Right now my priority is keeping him safe from another fall.
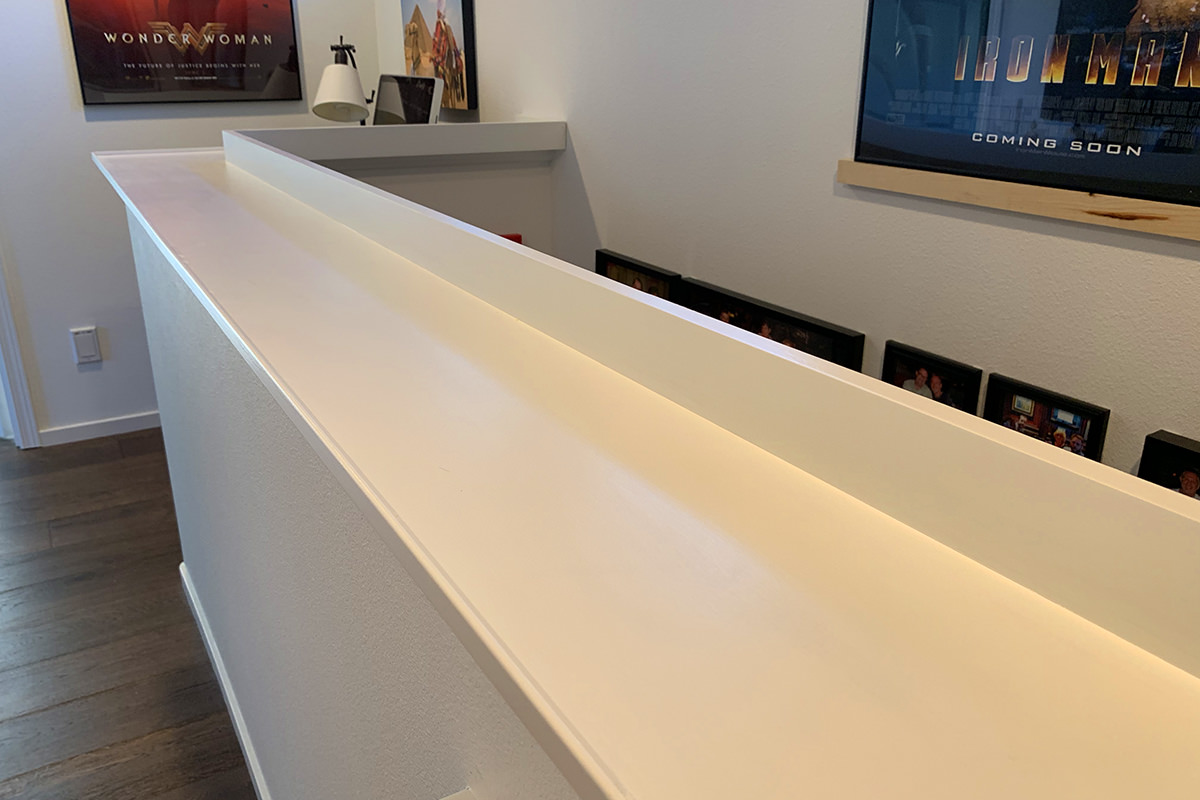
When I design projects I also write out a task list and a schedule so I know how long it will take. For my new "banister cat tray" I had one evening allotted for construction. One evening to fill nail holes, sand, and prime. And one evening to smooth-sand and paint two coats. Which means I was ready to install it yesterday morning...
The carpet that goes on the bottom arrives on Wednesday. In the meanwhile, I hope things are a little safer for Jake and Jenny. At least Jake can't fall asleep... then fall off... so easily again.
From the bottom, it's not very obtrusive, which is nice...

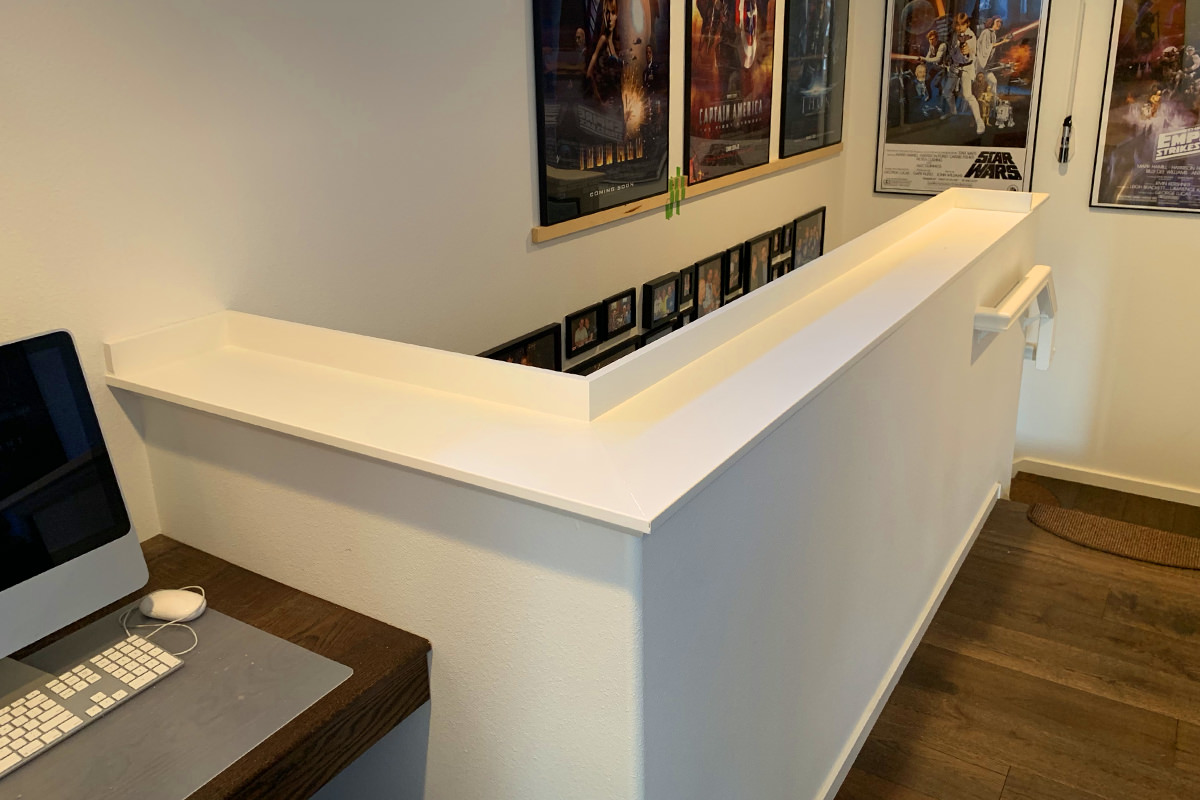
I sent the photos to a friend who does carpentry... he replied with "DESIGN FAIL! Somebody using the hand railing for the stairs will run into your construction!"
I couldn't understand what he was talking about until I realized that the angle of the photo doesn't show the whole story. So I sent him this photo and said "YOU WERE SAYING?!?"...
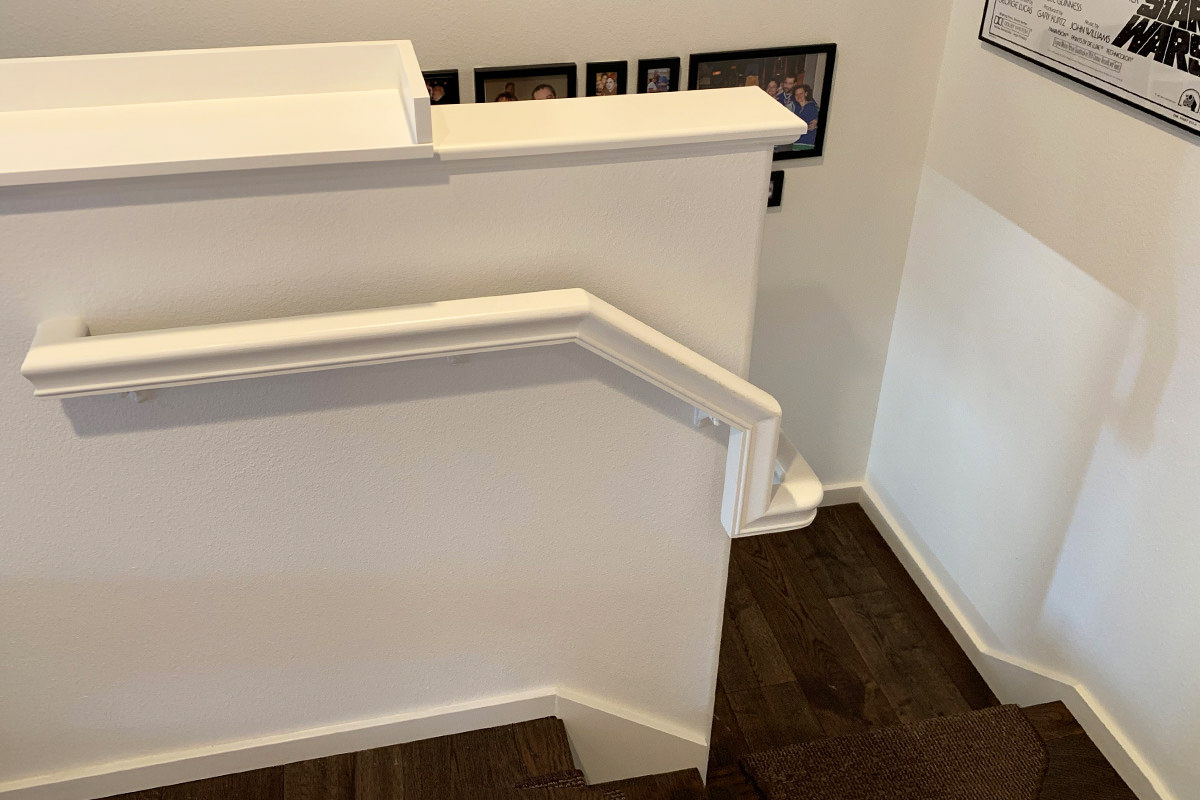
Turns out I actually DO put some thought into my projects!
Eventually I want to build a narrow staircase so they can climb up to the banister instead of making a dangerous jump. Until I do that, I put a bench in front that they can use to hop up more easily. Jenny was the first to take a look...
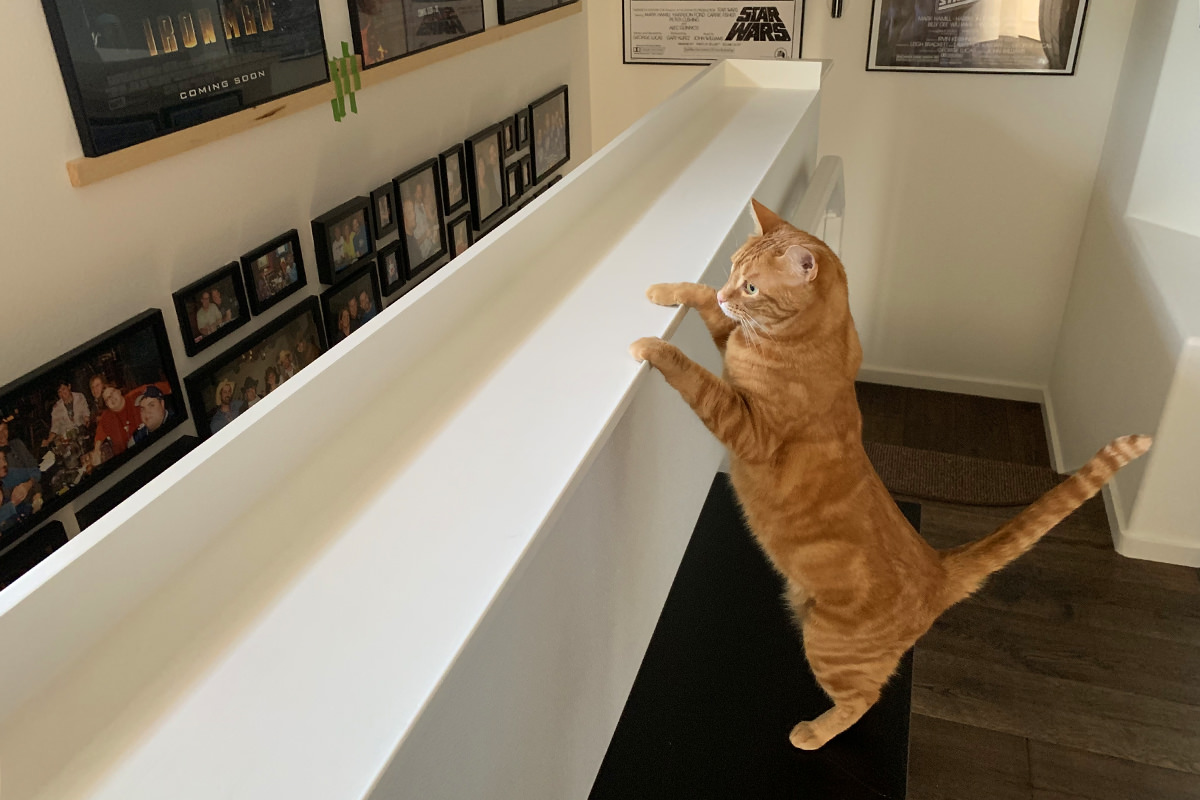
And there you have it... a safer, conveniently cat-sized walkway!
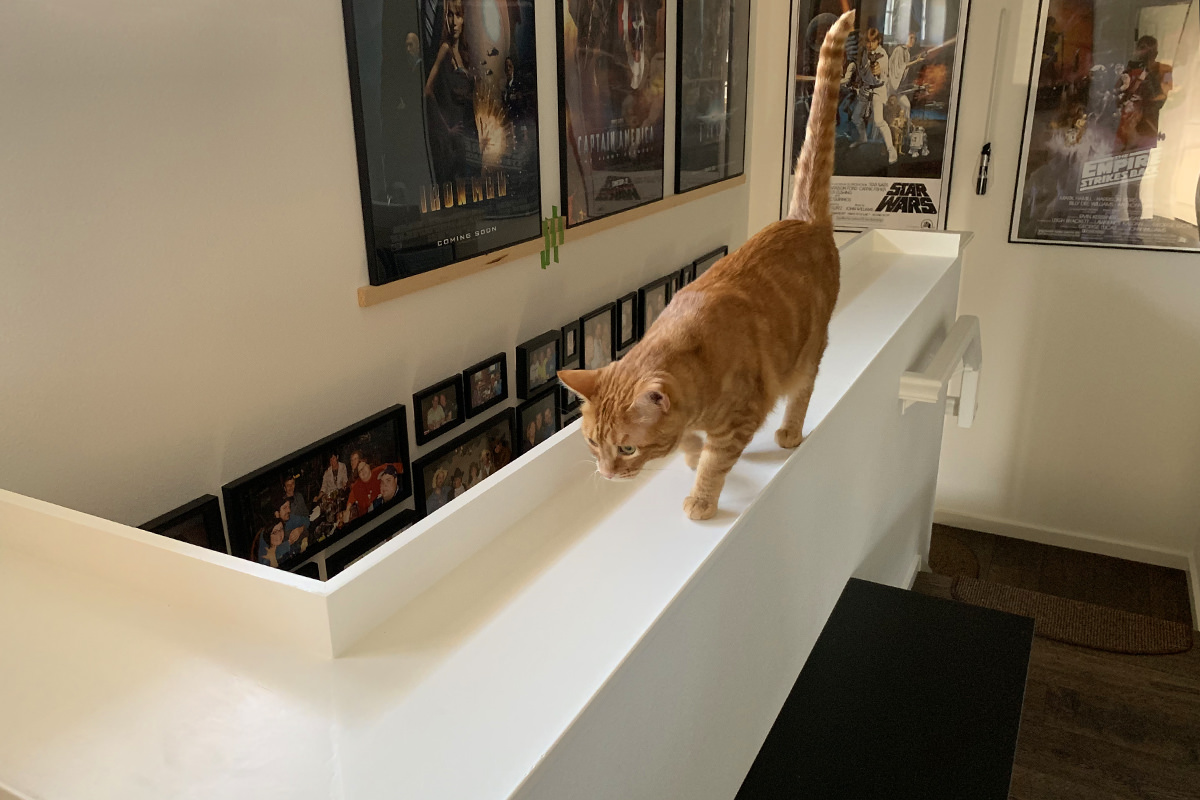
And now to think about how I can build cat stairs... and a safety ledge for the windows above the stairwell where Jenny likes to play. A "feature" of my house that terrifies me to no end. The girl is fearless when it comes to heights. Which is fine. But only when it's reasonably safe! She likes to be totally UNSAFE, and it drives me crazy.
Until next Caturday...
My pricey new Milwaukee cordless M18 Dual Bevel Sliding Compound Miter Saw is choice. I love it. But more on that later. Let's talk about my new Milwaukee cordless M18 Random Orbital Sander. When it was released last year, I took a hard pass because A) It was $99 without battery, and B) My corded sander works perfectly fine, and there was no sense spending money to replace it.
But last night as I was attempting to sand down my latest project, the cord on the sander snagged on a bottle of glue that was sitting next to a pan of kitty litter and both went crashing to the floor of my single-car-garage woodshed. There just aren't many outlets in a garage, so I'm always running into problem like this (as well as running out of outlets).
While attempting to clean up the horrendous disaster that comes from glue mixing with kitty litter, I suddenly realize that "Boy, a cordless sander sure would have been handy." Minutes later I was digging into my savings as I cruised Home Depot's website. In-store pickup, here I come...
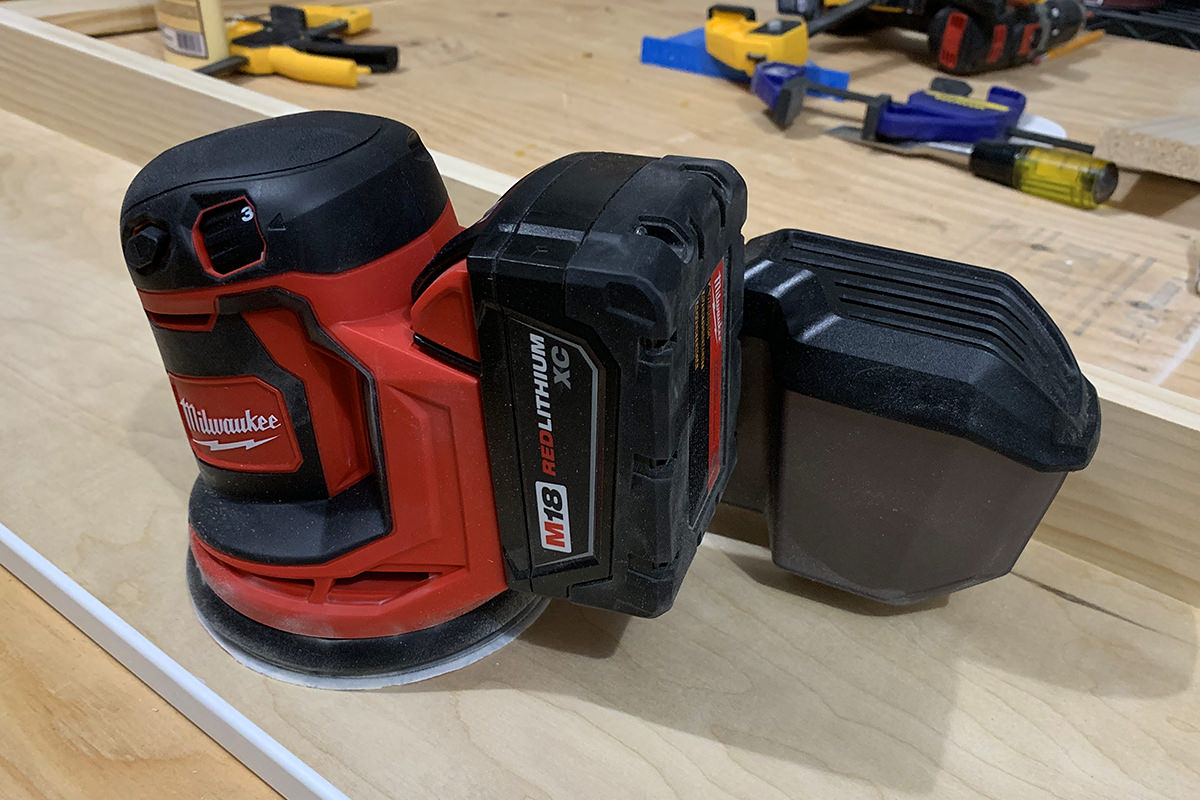
I have no idea... none how I survived without this. I thought the battery would make it heavy and difficult to navigate. Nope. Far, far less difficult than wrangling a cord, even with the added weight. In fact, as shown in the photo, I have my medium M18 instead of my smaller M18 battery, and it's perfectly fine. The kit comes with a dust-catcher extender, so I even have the option of using my mega-battery on it if I wanted to!
And it's not just the lack of a cord that makes it so fantastic... it has multiple speeds (my old one didn't) and the random sanding "pattern" seems to do a better job of making quick work of large areas to boot. If you've already got some Milwaukee M18 batteries knocking around, the convenience of cordless is pretty much a no-brainer.
And then there's the Milwaukee cordless M18 Dual Bevel Sliding Compound Miter Saw...
I had no intention of replacing my faithful old Ryobi... until it went out of alignment and I couldn't get good cuts from it (nor get the laser guide to aim straight). Maybe somebody smarter than I could have figured out how to fix it, but I was done. My first instinct was to spend the $220 to get another Ryobi. It provided years of faithful service, was relatively inexpensive, and I was familiar with it. But then I saw that Milwaukee had a kit with an extra maximum performance M18 battery on sale for $600 (down from $850) and decided I'd spend the money on quality now rather than having to replace another Ryobi in 4 years...
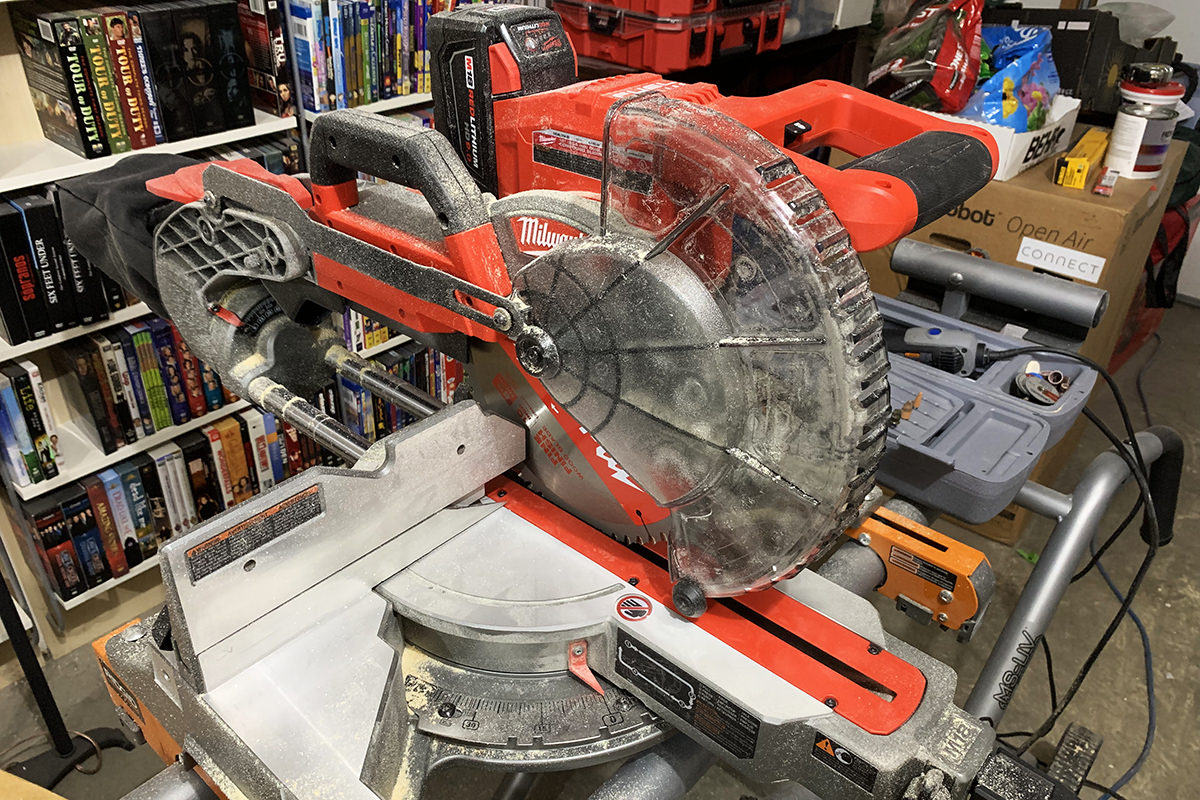
My worries were A) A cordless saw would have much less power than a corded version, and B) All the reviews talked about what a shitty job it did of collecting dust.
Turns out that A) It has plenty of power to cut through anything I've thrown at it... including Trex decking and hardwoods, and B) All the reviews were right... the dust collection is so bad that I don't even know why they bother putting a bag on it in the first place since hardly any dust ends up in there.
The dust collection problem is annoying, but not a dealbreaker. No miter saw catches all the dust, so what's a little more? Still, you have to wonder what in the hell Milwaukee was thinking that they couldn't have done a better job of it.
Just as with every Milwaukee cordless tool I've ever owned, the benefits of going cordless far outweigh any drawbacks in the ultimate design. I can move it anywhere in my garage shop without having to unplug/plug which is great. I also have one less cord to trip over and one less outlet occupied, which is really great.
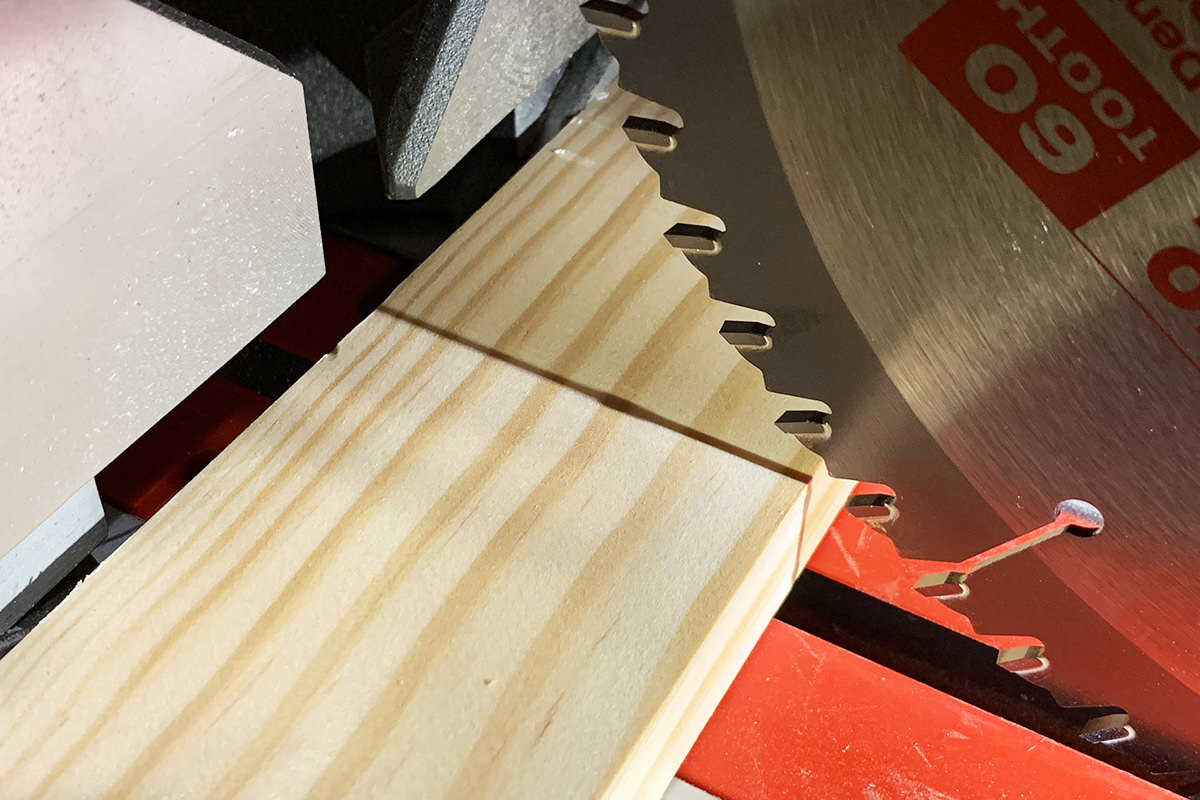
Dust collection aside, there are a number of things that Milwaukee gets right. First of all, they've done away with a laser guide in favor of a shadow cut-line indicator. Before using it, I thought this was a detriment. Because lasers are awesome, yo. But then I used it and realize what a huge boost to accuracy it is. A shadow of the actual blade not only shows you exactly where the cut occurs and how much material the blade will be removing... but it also will never go out of alignment, something that plagued my Ryobi...
Another thing I like is the design of the slider. With most miter saws, the tool slides along rails that poke out behind the saw on the top. With Milwaukee, the rails are inside the unit and on the bottom. It's just cleaner with less obstruction on top, though I have no idea if this could be a problem after dust ends up on the rails. How would you clean that? I dunno.
As is par for the course with Milwaukee, the little details are nicely accommodated. The blade cover locks open for easy access (I loathed having to fumble with it on my Ryobi every time I changed blades). Changing angle or bevel is not only fast and easy, but seriously balls-on accurate. On my old saw when I had to meet two 45° angles for a corner, there was always a slight error that crept into the mix. But with my Milwaukee, they meet up flawlessly every time on the first try, corner after corner. No more sanding or filler! Another plus? The saw is fairly lightweight and can be carried from the top or side. I keep mine permanently mounted on my awesome Rigid mobile folding stand, but it's nice to know I could transport it easily.
Ten out of Five Stars. Would purchase again.
As mentioned yesterday, I'm building a ledge tray for my banister to (hopefully) keep my cats safe in the stairwell. After work I had time to paint a base coat. All I have now is a light sanding and two more coats and it will be good to go (the carpet for the bottom arrives next week)...
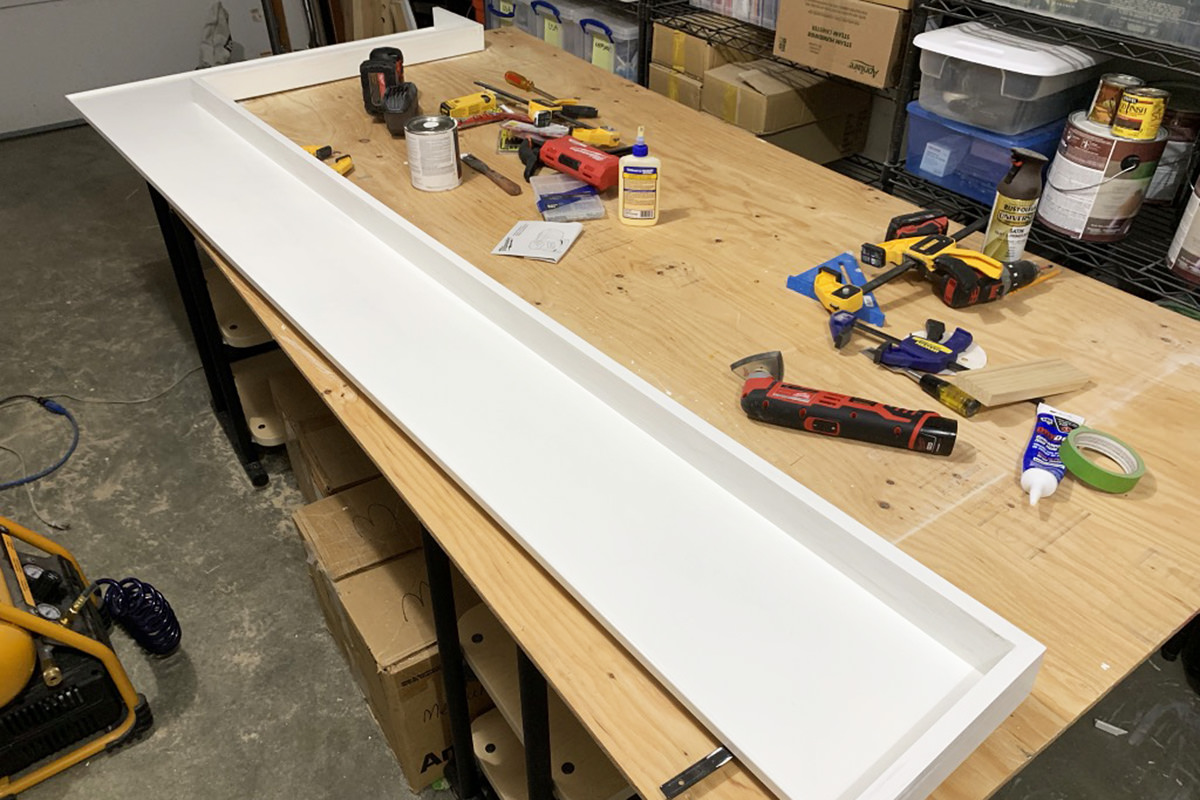
This unanticipated little project has me chomping at the bit to get started on my kitchen cabinets! Now THERE is a job that will make good use of my pricey new toys!
 Today was my twice-annual HVAC checkup where a technician looks at my air conditioning and heating setup to see if it's going to last another six months. As one of the only two things left to replace in my house*, I feel like I'm rolling the dice every time they show up.
Apparently things look fine. The system is old, but well-maintained and in good shape, so fingers crossed. Losing air conditioning wouldn't be terrible since I rarely use it anyway. But heating? Yeah. Gotta have that. So I guess the real test will be my next check-up in six months. When once again I'll be rolling the dice to see if I have a hideous home home expense.
But, in the meanwhile... Full steam ahead on my kitchen remodel.
I cleaned out my garage and have started parking my car outside. I've unpacked all my tools and have drawn up plans. I've ordered a sample of the pocket hinges and pull-handle hardware I'm thinking about. I'm looking at paint. I've priced out countertop materials I'm interested in and started researching sinks.
This weekend I'll be hanging plastic sheeting in my garage to keep the crap stored there dust-free. Then I'll be setting up my tools and a space to work.
And then?
I guess we'll find out if I can build a kitchen.
*The other being my water heater. I'm sure that's just minutes away from dying.